
Everything You Always Wanted to know about Deauthentication but were afraid to ask. (Discount code inside)

In today's article, we are going to cover how to deauthenticate some Wi-Fi-connected cameras using the flipper ESP32-S2 developers board flashed with the marauder firmware by justcallmekoko . We'll also cover how to sniff for deauthentication frames and how you can protect yourself against it.
MEET AMEC0E
The author of today's LAB401 Academy article is Amec0e, a security researcher and an occasional CTF player.
He originally got into security by playing with wireless attacks on his own hardware, this was fascinating to him back in the day performing a 4-way handshake capture and trying to dictionary attack his own router and from there, his curiosity eventually lead him to CTF's where he participated in several CTF Live Hacking Events online collaborating with some great friends and hackers and even scoring a few bounties on the way.
After playing CTF's for a year and doing many web-related CTFs he found a love for web application hacking. So he started to focus on more web-related issues learning the many different ways to break a website and report vulnerabilities to the affected vendors.
LESSON SUMMARY
Here is a list of what we are going to cover in today's article:
- What a deauthentication attack is.
- How a deauthentication attack works.
- A demonstration of deauthenticating a wireless camera.
- How you can try to mitigate this kind of attack.
- How we can detect an ongoing attack.
And finally what other alternatives are there to the flipper zero developers board.
NOTE: Flipper Zero Firmware used during these videos.
I would like to point out I am going to be using the Official Flipper Zero Developers Build Firmware with the Marauder Companion App which I have compiled for this release of the firmware.
We are not going to cover compiling the FAPs in this article as there is already some great documentation available for this on the [Flipper Zero GitHub page].
WHAT IS A DEAUTHENTICATION ATTACK?
A deauthentication attack is a wireless attack in which an attacker will send multiple deauthentication frames to a station to overwhelm them which can result in a denial of service to either a selected station (client device) or to every station on the network.
This would allow for the attacker to combine this with another attack called the Evil Twin, or even use this to capture a 4-way handshake which could be cracked using a dictionary attack to obtain the Access Point's passphrase, which we are not going to cover here as we are purely focusing on the deauthentication attack.
It is worth mentioning the Flipper ESP32-S2 Developers board operates on 2.4GHz only, and as such, this particular attack will only work if the devices are connected to the 2.4GHz network on your wireless Access Point.
Luckily for us, our cameras are sitting on the 2.4GHz network.
How Does A Deauthentication Attack Works:
The attack works by broadcasting multiple deauthentication frames using the selected Wireless Access Point's MAC address and a special broadcast address of FF:FF:FF:FF:FF:FF this will transmit to all stations on a wireless access point.
The deauthentication frame is implemented in the IEEE 802.11 Wi-Fi standard as a way for telling a station that its connection is being terminated, this works both ways from a station to an Access Point and from an Access Point to the station.
There's something we need to know though before we dive into an example and that is, what is the difference between a Wi-Fi association frame and an authentication frame.
Authentication: The connecting device opens a line of communication to the Wireless Access Point containing the devices identity (MAC). The WAP then sends a response of an success or failure, there is no encryption or security available at this point.
Association: After authentication has received a success response a association request is sent containing information such as SSID the client wants to connect to, encryption type, supported channels and other 802.11 capabilities. If the 802.11 capabilities of the client match that of the WAP a Association ID (AID) is assigned and a response with a success message is sent granting full access to the WAP.
In most home routers you will both authenticate and associate at the same time and of course if you need to disconnect you will both disassociate and deauthenticate at the same time.
Though in a larger network made up of multiple Wireless Access Points it is possible to disassociate from one access point and associate to another while remaining authenticated to the same network.
Let us look at an example for a deauthentication frame: You are at home on your Wi-Fi and you notice your internet is slow, you told your neighbour they can use your internet while theirs is down, you check the connected devices on your Access Point's web configuration page and you notice the neighbour is taking up all of the bandwidth on the network.
You add their device to a Blocklist so you are able to freely browse the internet again, when you add them to the blocklist a deauthentication packet is received and the station will disconnect from the Wireless Access Point.
Because of the way IEEE 802.11 is designed a deauthentication frame is a notification, not a request that a device must comply and deauthenticate from the Access Point. This cannot be refused unless Protected Management Frames are enabled also called Management Frame Protection or MFP for short, which we will talk about later.
When this disconnect happens a reason code is also supplied within the data frame sent from the Access Point to the Station telling the Station the reason why it is being deauthenticated. In this above example, it will be the reason code 4 - Disassociated due to inactivity. At least this is what I found during my testing when I added a client device to the blocklist.
This is precisely what we are doing with the flipper deauthentication attack, the flipper is transmitting an Ethernet Broadcast Address which is a special address used to transmit data to any available stations that are associated with the selected access point, with a reason code of 2 (Previous authentication is no longer valid) to deauthenticate all clients on the network.
This happens in the background and you cannot see the frames being sent unless you have a second flipper with a developers board or a network adapter with a supported chipset to be able to sniff the traffic for deauthentication frames.
Because we are sending it to any available stations this also means that the Source Address and Transmitting Address must come from the Access Point (or appear to) otherwise the stations associated with the access point will ignore the broadcasts. This also means you do not need to populate a list of stations associated with the access points before launching the attack.
It is worth mentioning you can broadcast deauthentication frames from multiple access points, however, the more you select the less effective the attack will be because more time is taken to broadcast each deauthentication frame with the spoofed MAC address of the selected AP, and so when a disconnect happens the station will immediately try to reconnect if we send a frame too slow then the station will connect back to the Wireless Access Point, this is not what we want as the goal here is to keep the station disconnected for as long as we want.
ATTACK DEMONSTRATION
Shared Power Rail Issue:
The power rail is shared between the developers board and the SD card. When it is inserted, it can cause issues with the SD dropping the connection or dismounting. Rebooting fixes that, this does not happen every time but it is best to reboot your flipper once you have plugged in the developers board to the flipper zero.
Flipper Deauthentication Process:
So now we have covered the power rail issue and the flipper zero is rebooted, we are going to prepare the deauthentication attack.
First, we are going to navigate on our flipper zero to "Scan AP" and press "Center", let this run for a few seconds, and then press back.
Now we have a briefly populated list of APs, we need to view the logs to find the ESSID and Channel number. So let's go to "view logs" and press "Center" and scroll down until we find our access point.
Once you have found the ESSID, mine is TP-Link, and our channel of 2 we are going to press back and then set the channel. So let's scroll to "Channel" and change from "Get" to "Set" and Press "Center".
We are going to enter our channel number of 2 and then press "Save" and back twice.
Now we need to find out what position our AP appears in the list, so let's scroll to "List" and press "Center".
You can see my TP-Link router is 0 number in the list, so let's press back and go to "Select", and press "Center".
Now we enter our AP number of 0 and press "Save" and press back twice.
And we are ready to initiate the deauthentication attack.
So now we are ready we are going to change to our cameras live feed and as you should be able to see an image of the LAB401 logo.
You can also see the current time and date in the time stamp to the top left of the camera feed.
Now we can start the deauthentication attack by scrolling to "Attack" and pressing "Center".
Now the deauthentication attack is running our camera feed will begin to slow and eventually freeze, how long this will take depends on how close you are to the target camera, the closer you are, the stronger the signal and the more packets it receives, the further away you are the weaker the signal and the more packets that can be lost during transmission.
Now the camera feed has frozen this indicates the attack was successful you will then see the video feed try to refresh, you will also notice it is taking a while and this is because it has been disconnected from our network and is trying to reconnect back but because the flipper zero is still transmitting it will stay offline until we stop the attack or move far enough out of range that the transmitting packets get lost entirely.
What I did there was demonstrate the ability to launch a deauthentication attack, knocking the camera offline.
When we stop the deauthentication attack we must wait for our wireless camera to connect back to the network, this can take some time and sometimes you may even need to reboot the camera by turning it off completely and allowing it to perform the authentication and association process again.
HOW CAN YOU PROTECT AGAINST IT?
In terms of protection against this type of attack, our options are quite limited due to the lack of encryption for the management frame meaning it will allow spoofed deauthentication frames as there is no message integrity check or management frame encryption to ensure the packet has not been tampered with, copied or replayed.
This was addressed with the amendment of the IEEE 802.11w in 2009 introducing Protected Management Frames.
Management frames include deauthentication, disassociation, beacons and probes and are always unauthenticated and unencrypted.
Now there is two types of Protected Management Frames and these are.
Client Side Protected Management Frame: This encrypts the management frames sent between authenticated clients and the access point which allows clients to take preventative measures by dropping spoofed management frames that pass between the Wireless Access Point and the client that is authenticated and associated. Most deauthentication attacks against a Wireless Local Area Network (WLAN) with client side PMF enabled will simply degrade network performance by dealing with the valid clients.
Infrastructure Protected Management Frame: With this the Wireless Access Point will add a Message Integrity Check Information Element (MIC IE) to the management frames sent and any attempt made to copy, tamper or replay the frame invalidates the MIC and fails the management frame validation check. This will then report the failed MIC to the network management system but it will take no preventative measures.
MIC and Client side PMF are both present in the Wireless Protected Access (WPA2/3) security protocol.
WPA2-Personal: This is the standard security protocol you will find on most home routers, Protected Management Frames (PMF) on this type of protocol is optional, however, if it does not have the WiFi-certified logo on the box then it is very likely that protected management frames will not be enabled on this type of protocol. This is because vendors do not need to submit their devices to be certified by the WiFi Alliance.
WPA3: This is the latest Wi-Fi security protocol which comes by default with Protected Management Frames (PMF) enabled, however a lot of clients do not support this protocol and so they will not be able to connect to the WAP in which WPA3 is selected.
There are 2 main types of configuration options for Protected Management Frames if you have the option to enable them manually and these are.
Capable/Optional: This will be the default option for an encrypted WiFi network with the WPA2 security protocol selected. This allows for backwards-compatible devices that do not support PMF to connect, and the devices that do support PMF will negotiate this with the selected AP.
Mandatory/Required: This enforces enabling PMF and as such only clients capable of PMF will be allowed to connect. WPA3-Personal and WPA3-Enterprise with 192-bit security have this enabled by default.
If you do not have the option to enable them manually then you will likely find it will only be enabled when you select the WPA2-Personal or WPA3 Security protocols.
Sadly there is no real way to stop someone from deauthenticating you as a home user other than selecting WPA2-Personal/WPA3 Security Protocol or if you can enable Protected Management Frames (Sometimes called 802.11w or Management Frame Protection) in your wireless settings you will most likely want to enable this option, though this option is not present on every home WAP.
If however, the device has the WiFi Certified logo on the box then it is likely to have PMF/MFP enabled but optional on WPA2-Personal.
There is another mitigation for this type of attack and while it might not be convenient for everybody (especially since the camera used can ONLY connect via Wireless) it is an effective solution from this type of attack and that would be to go with a completely hardwired setup, this would mean plugging every device in that you wish to connect to the AP via an Ethernet cable and putting the AP itself in Modem Mode so no wireless access is provided.
This will provide clients access to the network via the Ethernet slots on the back of the AP, this would also assume the cameras can be connected via a Ethernet Cable.
Like most home users you are likely using a passphase (PSK) to access your WAP and if so you will want to choose a good passphrase that is hard to guess to prevent an attacker from cracking your passphrase with a dictionary attack.
HOW CAN YOU DETECT A DEAUTHENTICATION ATTACK?
Okay so now we are going to talk about how we can detect an ongoing deauthentication attack, this we can actually detect with the flipper zero and developers board as the wireless adapter I am going to be using is also a 2.4GHz network adapter.
I'm going to be using an Alfa Network AWUS036NHA 2.4GHz wireless adapter, with an Atheros AR9271 chipset which allows for monitor mode and packet injection.
With this we are going to send a similar deauthentication frame from the Alfa card and then sniff for these deauthentication frames on the flipper zero, we are also going to be using the aircrack-ng suite which comes included with the Kali Linux Operating System.
With this setup we are going to put the network card in monitor mode, this allows it to listen for broadcasts and to sniff the wireless traffic going back and forth from APs to Stations.
Before we move on I want to point out that we do not need to put the card in monitor mode for this to work, I just find it to be a much cleaner process, having said that, let's move on.
Monitor Mode:
Before we start I want to mention I am using Kali Linux in a Virtual Machine, having said that we first want to open a terminal in Kali.
Next, we must kill any processes that may interfere with this by typing sudo airmon-ng check kill and entering your password.
If you have a intergrated adapter then the external adapter will likely use the interface wlan1 (mine here is wlan0) so let's put this in monitor mode with sudo airmon-ng start wlan0.
Now the card is in monitor mode the interface will now be called wlan0mon (this will be different if you have multiple adapters.)
Finding Our WAPs BSSID:
Now we have our adapter in monitor mode we are going to start sniffing wireless traffic to find our wireless access points MAC address and channel.
When this is running you are looking for the WAPs MAC that belongs to you, once you have the MAC address and channel number you can press CTRL+C to stop the sniffing.
So let's start sniffing and find our WAPs MAC and channel number with our Alfa card by using sudo airodump-ng wlan0mon.
As you can see you do not need to run this for too long to find, the channel number, and the MAC address.
Now we are ready to move on to setting our channel number.
Setting Our Channel Number:
So the purpose of this is just to change our wireless adapters channel to the one our target AP uses because prior to this we were channel hopping, which means we were constantly changing channel numbers to locate our target APs BSSID and channel number.
If we type iw dev we can see our current interfaces channel number.
We need to change this as it is required for the next step of the attack to work, this is a simple process and can be done by typing sudo iwconfig wlan0mon channel 2 and press Enter.
We can verify the channel has been changed using iw dev and looking for our interfaces "channel".
Now that this is done we can move on to initiating the deauthentication attack while simultaneously sniffing for deauthentication frames on the Flipper Zero.
Initiating The Deauthentication Attack:
Now we have our BSSID and our channel is set correctly we can initiate the attack with our 2.4GHz Alfa Network Card. But before that, we are going to head over to our Marauder app on the Flipper Zero and select the option "Sniff [deauth]".
Now the flipper zero is sniffing for deauthentication frames let's head back over to our Kali VM and start the attack using sudo aireplay-ng -0 100 -a Our BSSID -c FF:FF:FF:FF:FF:FF wlan0mon
Before we start the attack let's break down the command being used here:
- 0 - Specifies we want to run a deauthentication attack.
- 100 - Specifies how many times we want to send a packet.
- a - Specifies the target AP's MAC Address.
And c FF:FF:FF:FF:FF:FF This is the Special Broadcast Address, using this it will broadcast deauthentication frames to all stations within our proximity.
And finally wlan0mon - This is the network card that is in monitor mode.
Now if we go back to the flipper zero You can now see the deauthentication frames being broadcasted on the flipper.
Now we know how to detect an ongoing deauthentication attack with the flipper zero, let's move on to turning monitor mode off.
Turning Off Monitor Mode:
Now we have finished our attack we are just going to take our wireless adapter out of monitor mode this can be done on Kali linux using sudo airmon-ng stop wlan0mon.
5GHz Limitation:
So now we have demonstrated attacking with a 2.4GHz network adapter, you might be thinking we still cannot attack any 5GHz stations on a dual-band WAP due to the flipper developers board only operating on the 2.4GHz band.
While this is not usually too much of an issue, most pentesters and red teamers will want a network card that is dual band both 2.4GHz and 5GHz so they can see the full scope of stations available to them.
So we are going to briefly cover what alternatives there could be and there are five that stand out to me.
ALTERNATIVE TOOLS TO THE FLIPPER ZERO DEVELOPERS BOARD
So as I mentioned there are five alternatives to use instead of a flipper zero developers board for wireless deauthentication attacks, in no particular order these are.
Alfa Network AWUS036ACH:
This dual-band, dual antenna, network card features WPA3 protocol support which means it is capable of joining a WPA3-enabled network if you wish to use this as a regular wireless adapter to surf the net. It is discreet too!
It also uses the RTL8812AU Chipset which has been supported in Kali Linux since around version 2018.1, however you might need to install the Realtek rtl88xxau drivers to get this working, this also supports monitor mode, packet injection, and Wi-Fi standard 802.11ac.

Alfa Network AWUS036ACM
This dual-band, dual antenna, the network card is also a great addition as this uses the MediaTek MT7612U Chipset which is the same chipset found in the MK7AC adapter. This means it supports packet injection and monitor mode and it will work out of the box on both Kali Linux and Wi-Fi Pineapple, it also has the Wi-Fi standard 802.11ac

Wi-Fi Pineapple MK7:
This 2.4GHz band, triple antenna router is great if you plan on performing an Evil Twin or Rogue AP attack, it has an intuitive Web GUI which makes it easy to configure and use, the drawback with this is you still need an additional network adapter like the MK7AC or similar with a supported chipset to target 5GHz stations.
While it is not so discreet and in a public place is very noticeable, it can also be left behind at a target location with an external 5V 2A power source like a power bank and allows for remote access or even put into a backpack with a power supply for mobile testing and more discreet usage.
[Get it now at LAB401.com]

Wi-Fi Pineapple MK7AC:
This is the Wi-Fi Pineapples own dual-band, dual-antenna network adapter using the MediaTek MT7612U Chipset which works out of the box with Kali Linux and has been supported since version 2021.3 so there should be little to no additional setup required. This adapter also supports monitor mode, packet injection, and WiFi standards 802.11ac.

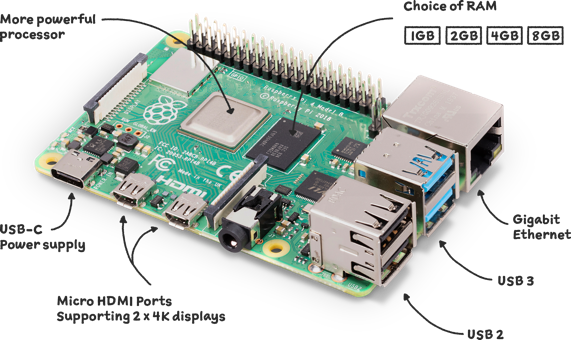
Raspberry Pi 4B:
That's right the raspberry pi 4b can also be used for this type of attack as well as the Evil Twin and Rogue AP Attack due to its small size and integrated dual-band wireless card this is a great little alternative used in many projects today, this can also be left behind at a target location similar to the WiFi pineapple and even powered from an external power supply like a power bank and remotely accessed as well as it is small and very portable too.
While all of these devices are great it does entirely depend on the job at hand.
Having said that all you really need is two wireless cards or adapters to perform a rogue AP or Evil Twin attack, this includes your onboard wireless card if you have one.
One wireless interface is used to host the rogue access point and the other would be used to perform the deauthentication attack. If however, you wanted to go the extra step further you can use a second external wireless adapter (2 external + 1 internal) to connect the rogue AP to the internet and provide a bridged internet connection this allows clients connected to the rouge AP to share the rouge APs internet.
Having two external adapters is the easiest and better option however it can also be a little more pricy, but this would allow you to Host the AP, perform a deauthentication attack and if the client connects, use our integrated wireless card to provide a internet connection to keep them on the rouge AP for as long as long as we can.
What We Have Covered Today
Today we have learned what a deauthentication attack is, and how a deauthentication attack works, we have also shown a demo of a deauthentication attack against a wireless camera as well as how you can better protect yourself against this kind of attack and other alternatives to the flipper zero for deauthentication attacks.
Well that about wraps it up, I hope you all enjoyed the article and videos and thank you all for taking the time to read this and also a BIG thank you to LAB401 for giving me this opportunity to share what I have learned on deauthentication attacks with you all, if you liked the article and videos be sure to give me a follow on Twitter. Take care for now and stay safe!
Feel Free to support me using the code AMEC0E at the LAB401 Checkout to receive a 5% Discount on all purchases (Excludes the Flipper Zero)
Resources worth reading:
Wi-Fi deauthentication Frame Explained - [https://blog.spacehuhn.com/wifi-deauthentication-frame]
What is a deauthentication attack? - [https://atlasvpn.com/blog/what-is-a-deauthentication-attack]
Protected management frames 802.11w - [https://security.stackexchange.com/questions/83356/802-11w-protected-management-frames-wi-fi/92657#92657]
Framing in detail - [https://www.oreilly.com/library/view/80211-wireless-networks/0596100523/ch04.html]
Broadcast address - [https://en.m.wikipedia.org/wiki/Broadcast_address]
802.11 Frame Exchanges - [https://howiWi-Fi.com/2020/07/16/802-11-frame-exchanges/]
Apple Secure access to wireless networks - [https://support.apple.com/en-gb/guide/security/sec8a67fa93d/web]
Protected Management frames enhance wifi security - [https://www.wi-fi.org/beacon/philipp-ebbecke/protected-management-frames-enhance-wi-fi-network-security]
Rogue AP With Raspberry Pi - [https://medium.com/@brunoamaroalmeida/rogueone-creating-a-rogue-wi-fi-access-point-using-a-raspberry-pi-79e1b7e628c6]
Infosec Weekly pt 4: Evil Twin Attacks - [https://medium.com/m/global-identity?redirectUrl=https%3A%2F%2Finfosecwriteups.com%2Fwifi-hacking-week-pt-4-evil-twin-attacks-63f79a800206]
RTL8812AU Kali Driver Install - [https://docs.alfa.com.tw/Support/Linux/RTL8812AU/]
FAP (Flipper Application Package) - https://github.com/flipperdevices/flipperzero-firmware/blob/dev/documentation/AppsOnSDCard.md
Cisco Management Frame Protection - https://www.cisco.com/c/en/us/support/docs/smb/wireless/cisco-small-business-wireless-access-points/smb5442-frequently-asked-questions-about-management-frame-protection.html
Leave a comment